Browse Author: admin

How Do I Save, Print or Share PDF Monthly Calendars?

We made it easy to save your monthly calendars to PDF and then share or print them. This is perfect for sharing with your co-parent or children who are not also subscribed to SmartCoparent.

For iPhone users, it is suggested to login to the website on your mobile device to create PDFs, print and share reports as Apple restricts printing and downloading on third party apps.

On your iOS device, please login to your account here or copy and paste this URL: https://app.smartcoparent.com on your mobile device.  The mobile website looks and works EXACTLY like the App Store App.


For iOS users (recommend to login to the mobile website instead of the AppStore App)

  • First, go to the side menu > select “Scheduling”
  • Then navigate to the month that you wish to download to PDF or to print.
  • Rotate your device to landscape and horizontal for a better layout
  • For printing – select the ‘Print icon at the top of the calendar’


  • For creating / sharing PDFs –  Select the iOS Share Icon on the top of the screen.
    • Choose > ‘Create PDF
    • To share – Select the iOS Share / Print icon, this time at the bottom of the screen
    • Select, e-mail, text or another device to share your PDF. Your PDF will be attached.

For Android users (mobile app or website)

  • First, go to the side menu > select “Scheduling”
  • Then navigate to the month that you wish to download to PDF or to print.
  • Select ‘Print’
  • Choose ‘Destination’ – either your printer or save as PDF


On your PC / Laptop (use the website)

  • First, go to the side menu > select “Scheduling”
  • Then navigate to the month that you wish to download to PDF or to print.


  • Select ‘Print’
  • Choose ‘Destination’ – either your printer or save as PDF
  • For sharing, select ‘save as PDF’. Save each month on your PC or Laptop and attach the files to your e-mail or text to share.


How Do I Download Transcripts of Messages and Private Notes / Journal Entries?

We are pleased to offer the ability to download chat messages and private journal entries into a time-stamped PDF format.

For mobile app users, especially App Store / iOS users – we recommend switching from the mobile app to our website or (on your smartphone or your PC : https://app.smartcoparent.com to download and share messages as the mobile devices offer limited downloading and print capability on third party apps.

The mobile website looks and functions exactly like our mobile app.

For Creating Messaging PDF Transcripts:

  • Go to Menu > ‘Messages’ > Select ‘Name’ to view chat that you wish to download


  • Select ‘View All’ > Then Select ‘Download’
  • The timestamped PDF transcript will download onto your PC or mobile app.


For Creating Notes / Private Journal PDF Transcripts:

  • Go to Menu > ‘Notes’ > Select ‘Download Notes’
  • The timestamped PDF transcript will download onto your PC or mobile app.

How Do I Remove Calendar Alert E-Mails?

To adjust your profile to turn off e-mail notifications of calendar entries, follow these easy steps:


  1. Login to your SmartCoparent account, go the ‘Menu’ => select ‘My Members’
  2. Locate your account (Power User) and select the ‘Edit’ Button.

3. In the next screen, uncheck the ‘Event Notifications’ button.

4. Select ‘Save’

You will no longer receive e-mail alerts for new or adjusted calendar events.

You can also turn off calendar alerts for your children members by following the same instructions as above, but selecting  the ‘edit’ button for your child member instead of yourself.


If you have any questions about calendar alerts or any other topics, feel free to contact us at support@smartcoparent.com

How Can My Adult Child Share College Expenses With Both Co-Parents?

SmartCoparent let’s your adult student share college expenses, or any expenses with both co-parents at the same time. This is an easy and neutral way for miscellaneous college costs to be shared among both co-parents and the student as well.

In this document, we will walk you through the three steps to create an easy 3-way expense sharing experience that your son or daughter can initiate from school:

a) Setting up your student’s account on SmartCoparent

b) Adding both co-parents to the student’s SmartCoparent account

c) Setting up payment instructions on SmartCoparent (for Premium subscribers)

d) Student initiates 3-way expense sharing, using the ‘Payment Request Function’


Setting up a SmartCoparent Account (one-time setup)

[vc_toggle title=”SmartCoparent Student Setup:” open=”false”]

First, your adult student will register at SmartCoparent to create an Adult Member account. The adult account will allow your student to access expense and payment features that a child account does not offer

The student can register on our website or on our mobile apps:

https://app.smartcoparent.com

https://itunes.apple.com/us/app/smartcoparent/id1289432220?ls=1&mt=8

https://play.google.com/store/apps/details?id=com.smartcoparent.app

[/vc_toggle]

Adding Parents as members (one-time setup):

[vc_toggle title=”Adding Parents as Members:” open=”false”]

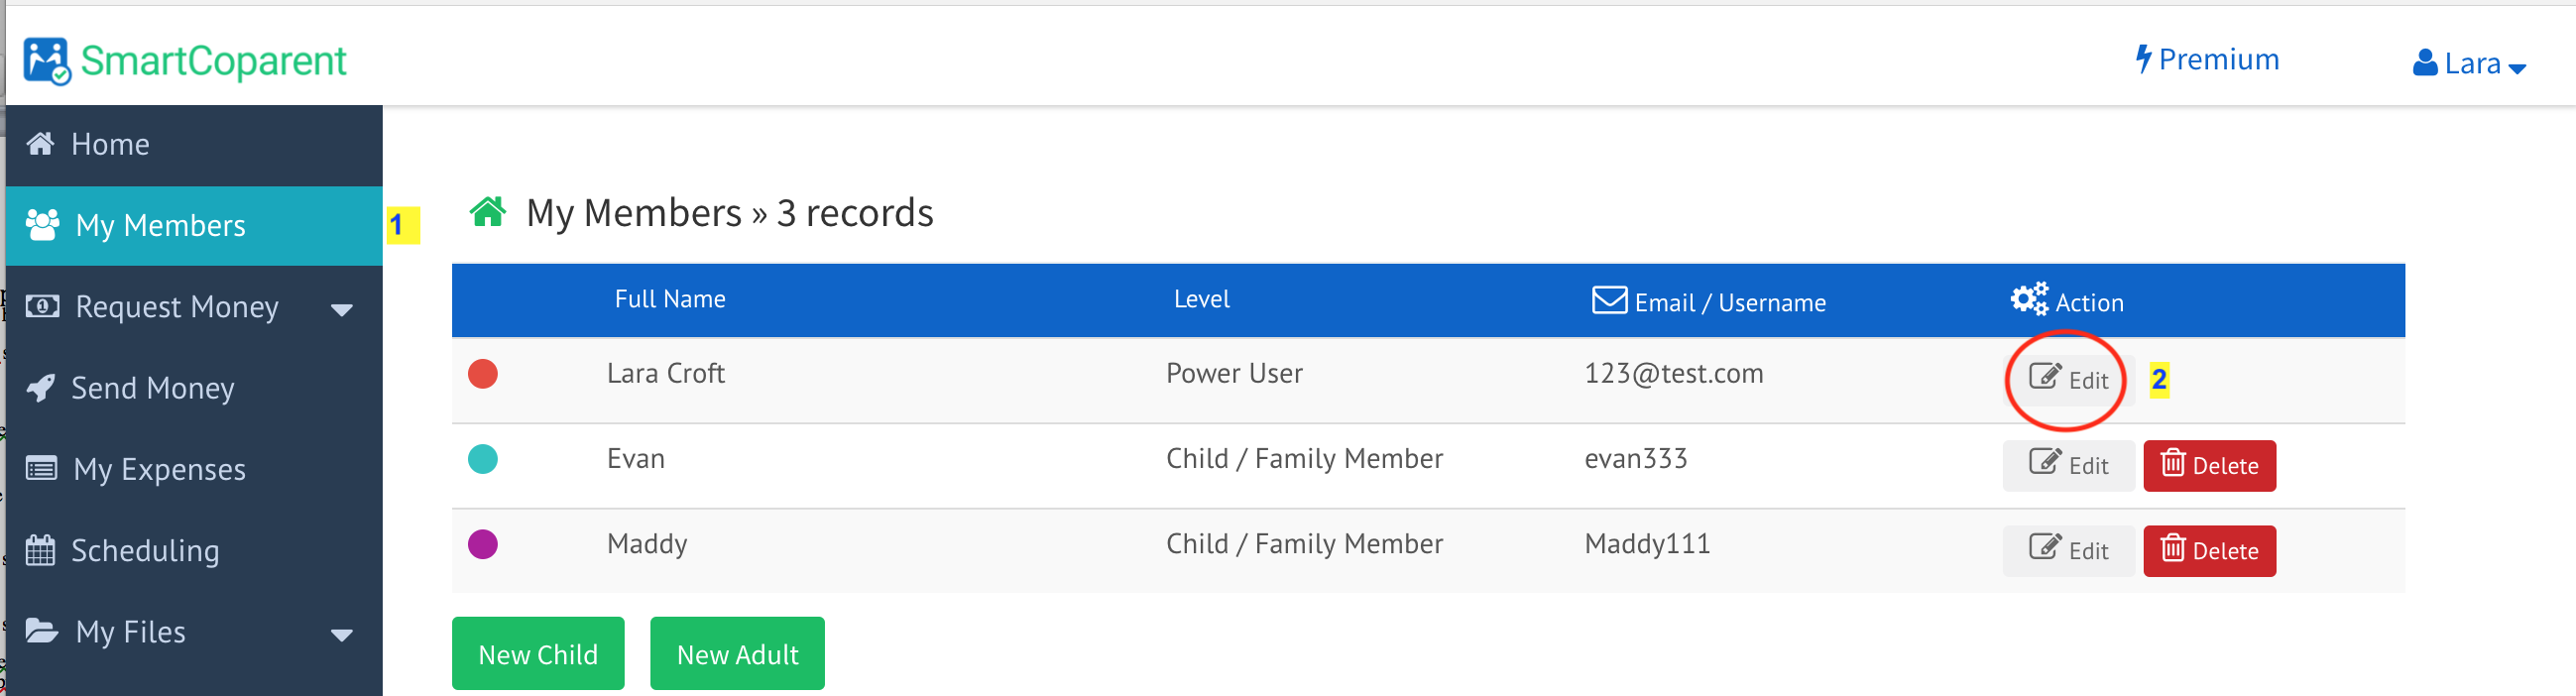
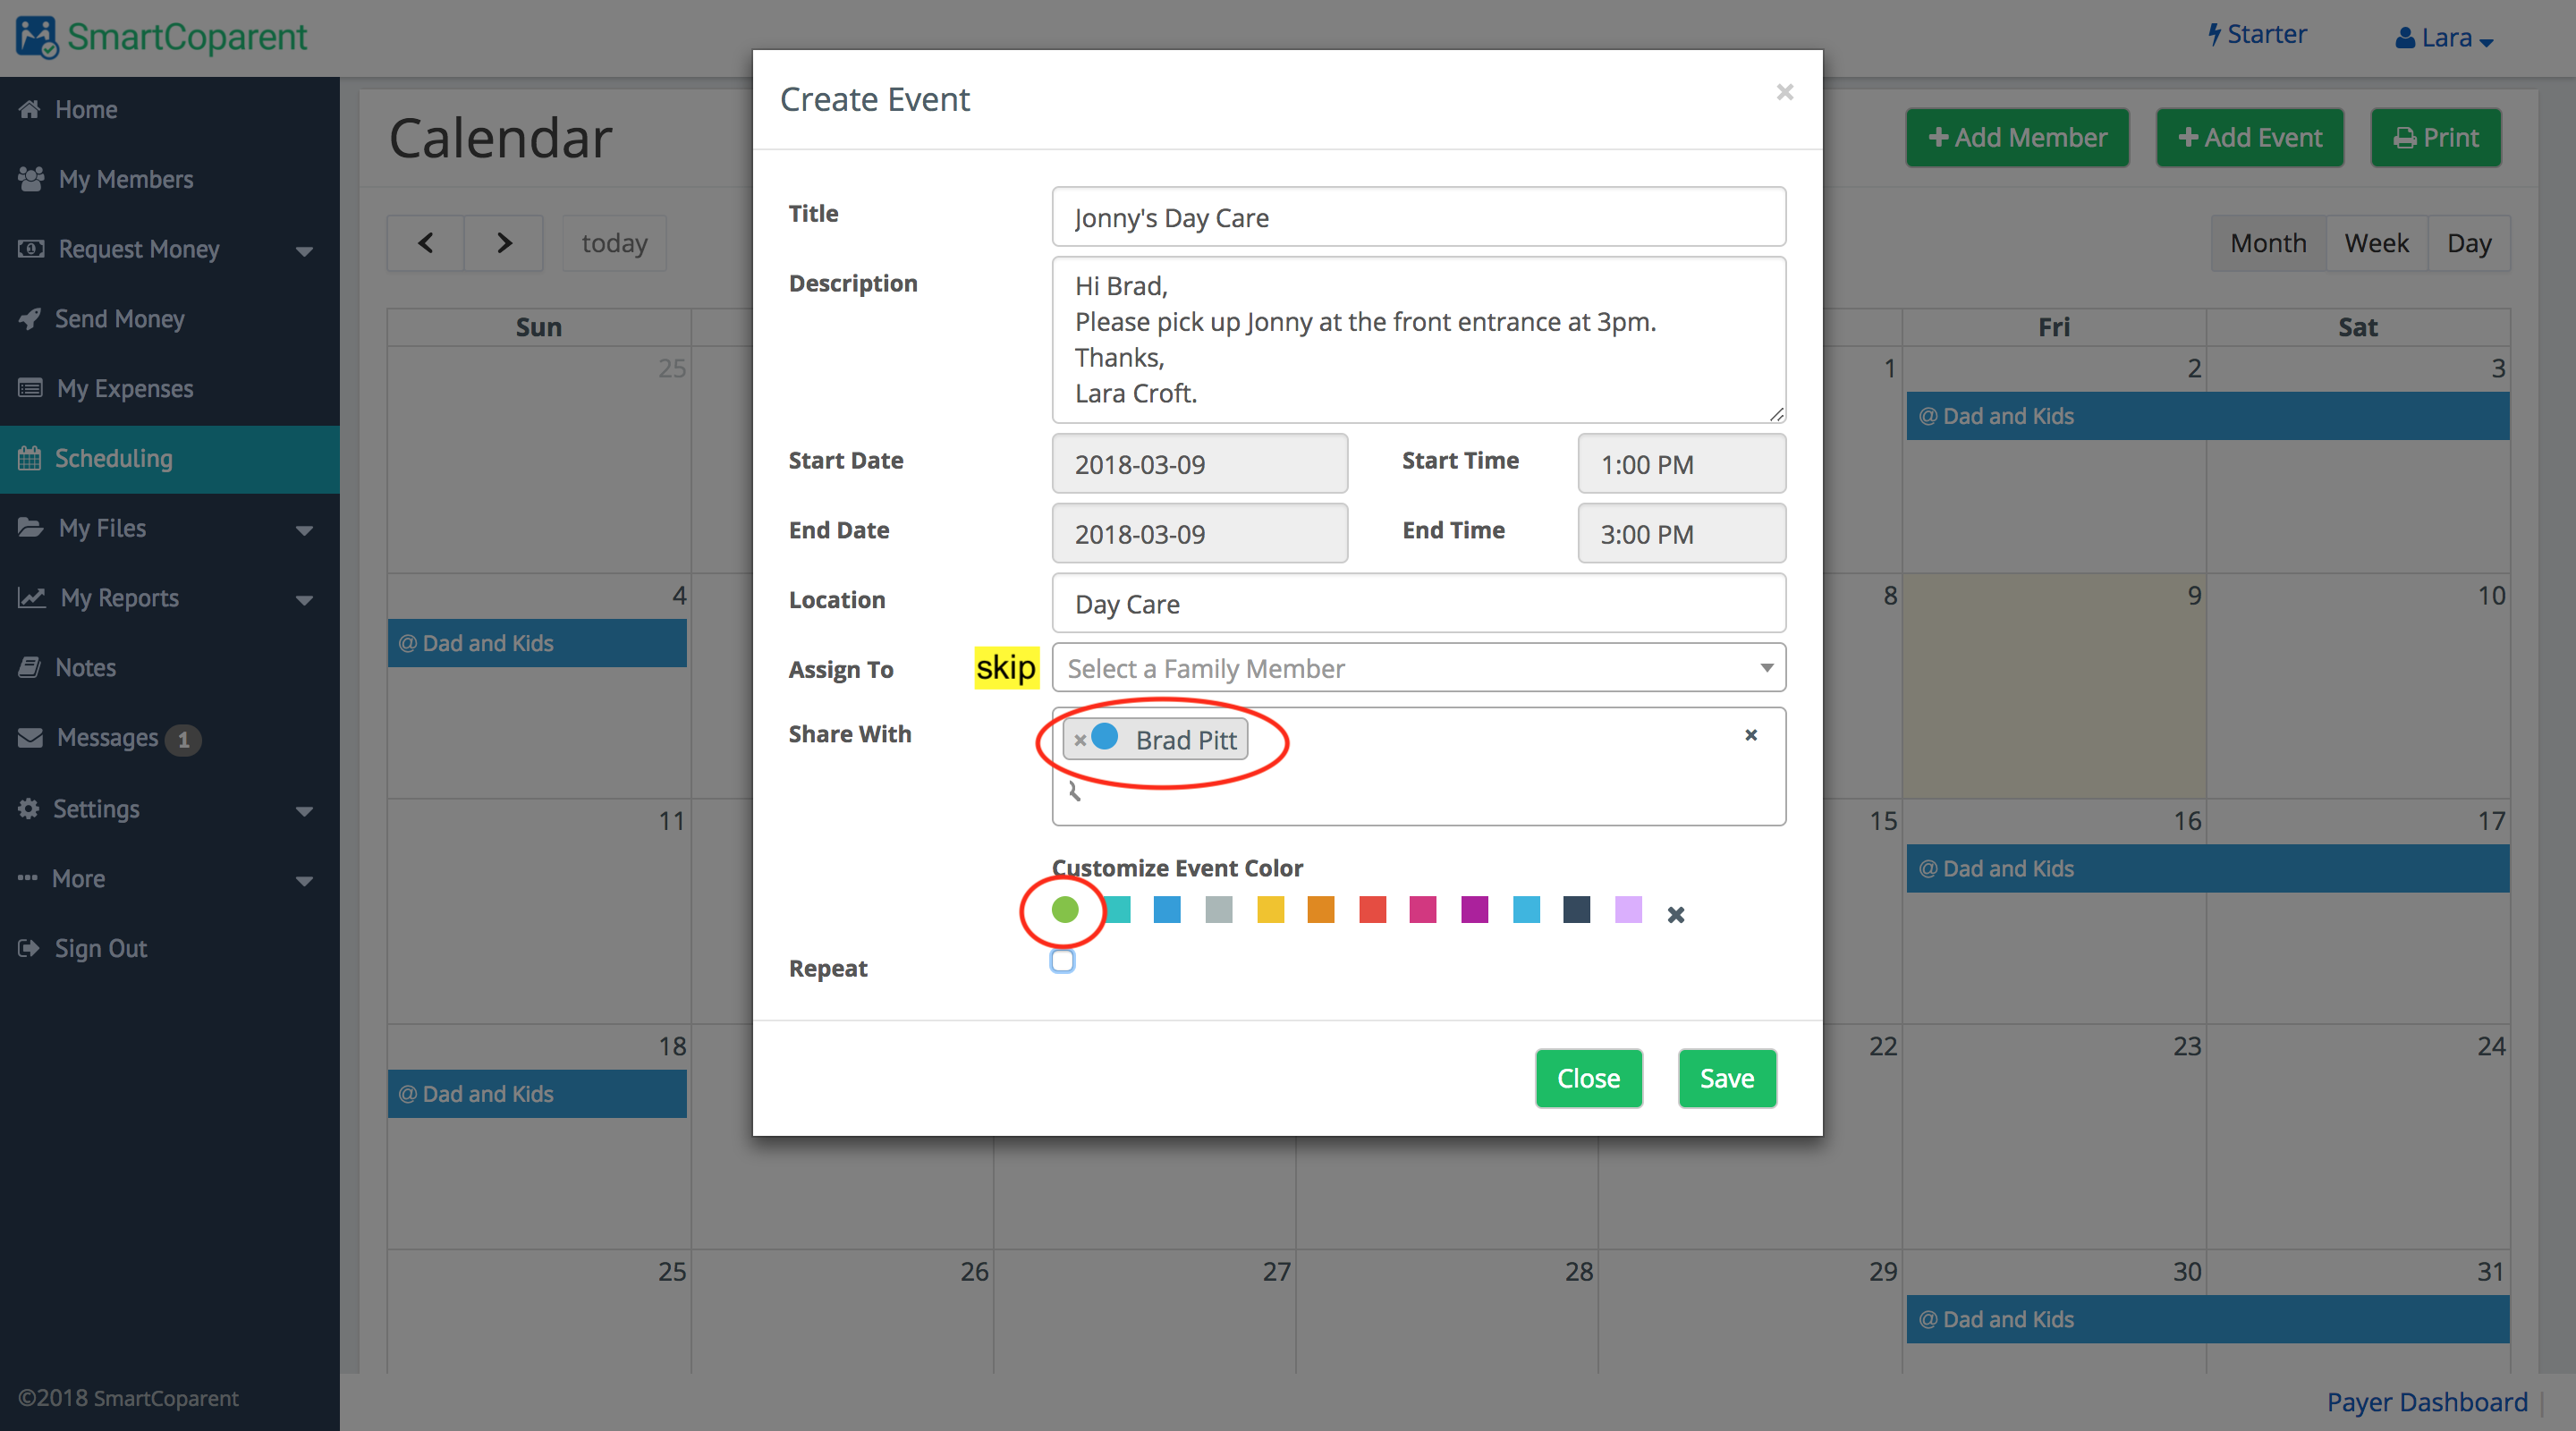
Once the student account is setup he/she can add both co-parents under a single ‘family’ account. This allows for both parents to receive one expense payment requests at the same time, while providing flexibility in allowing any kind of partial payment from either co-parent.

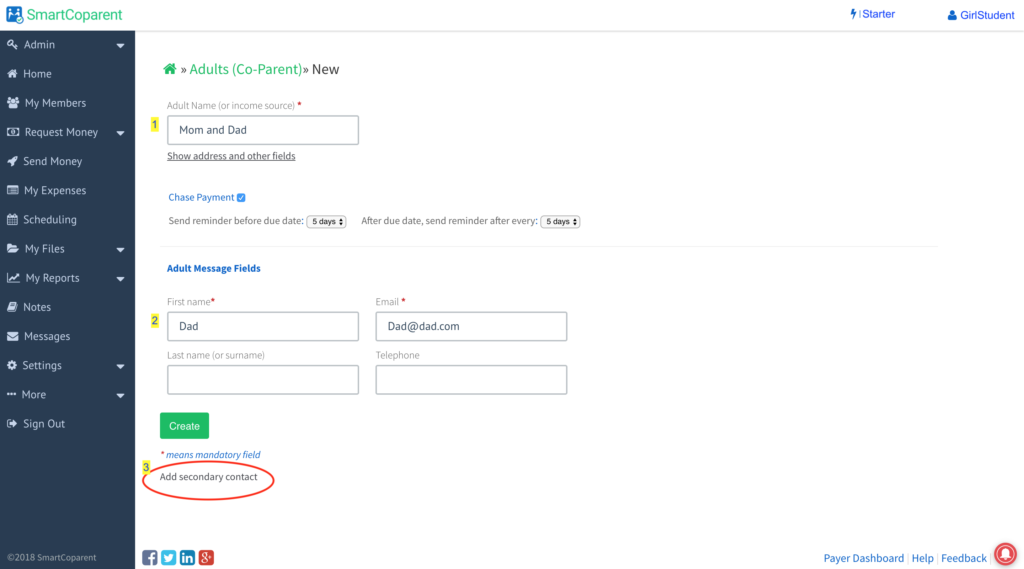
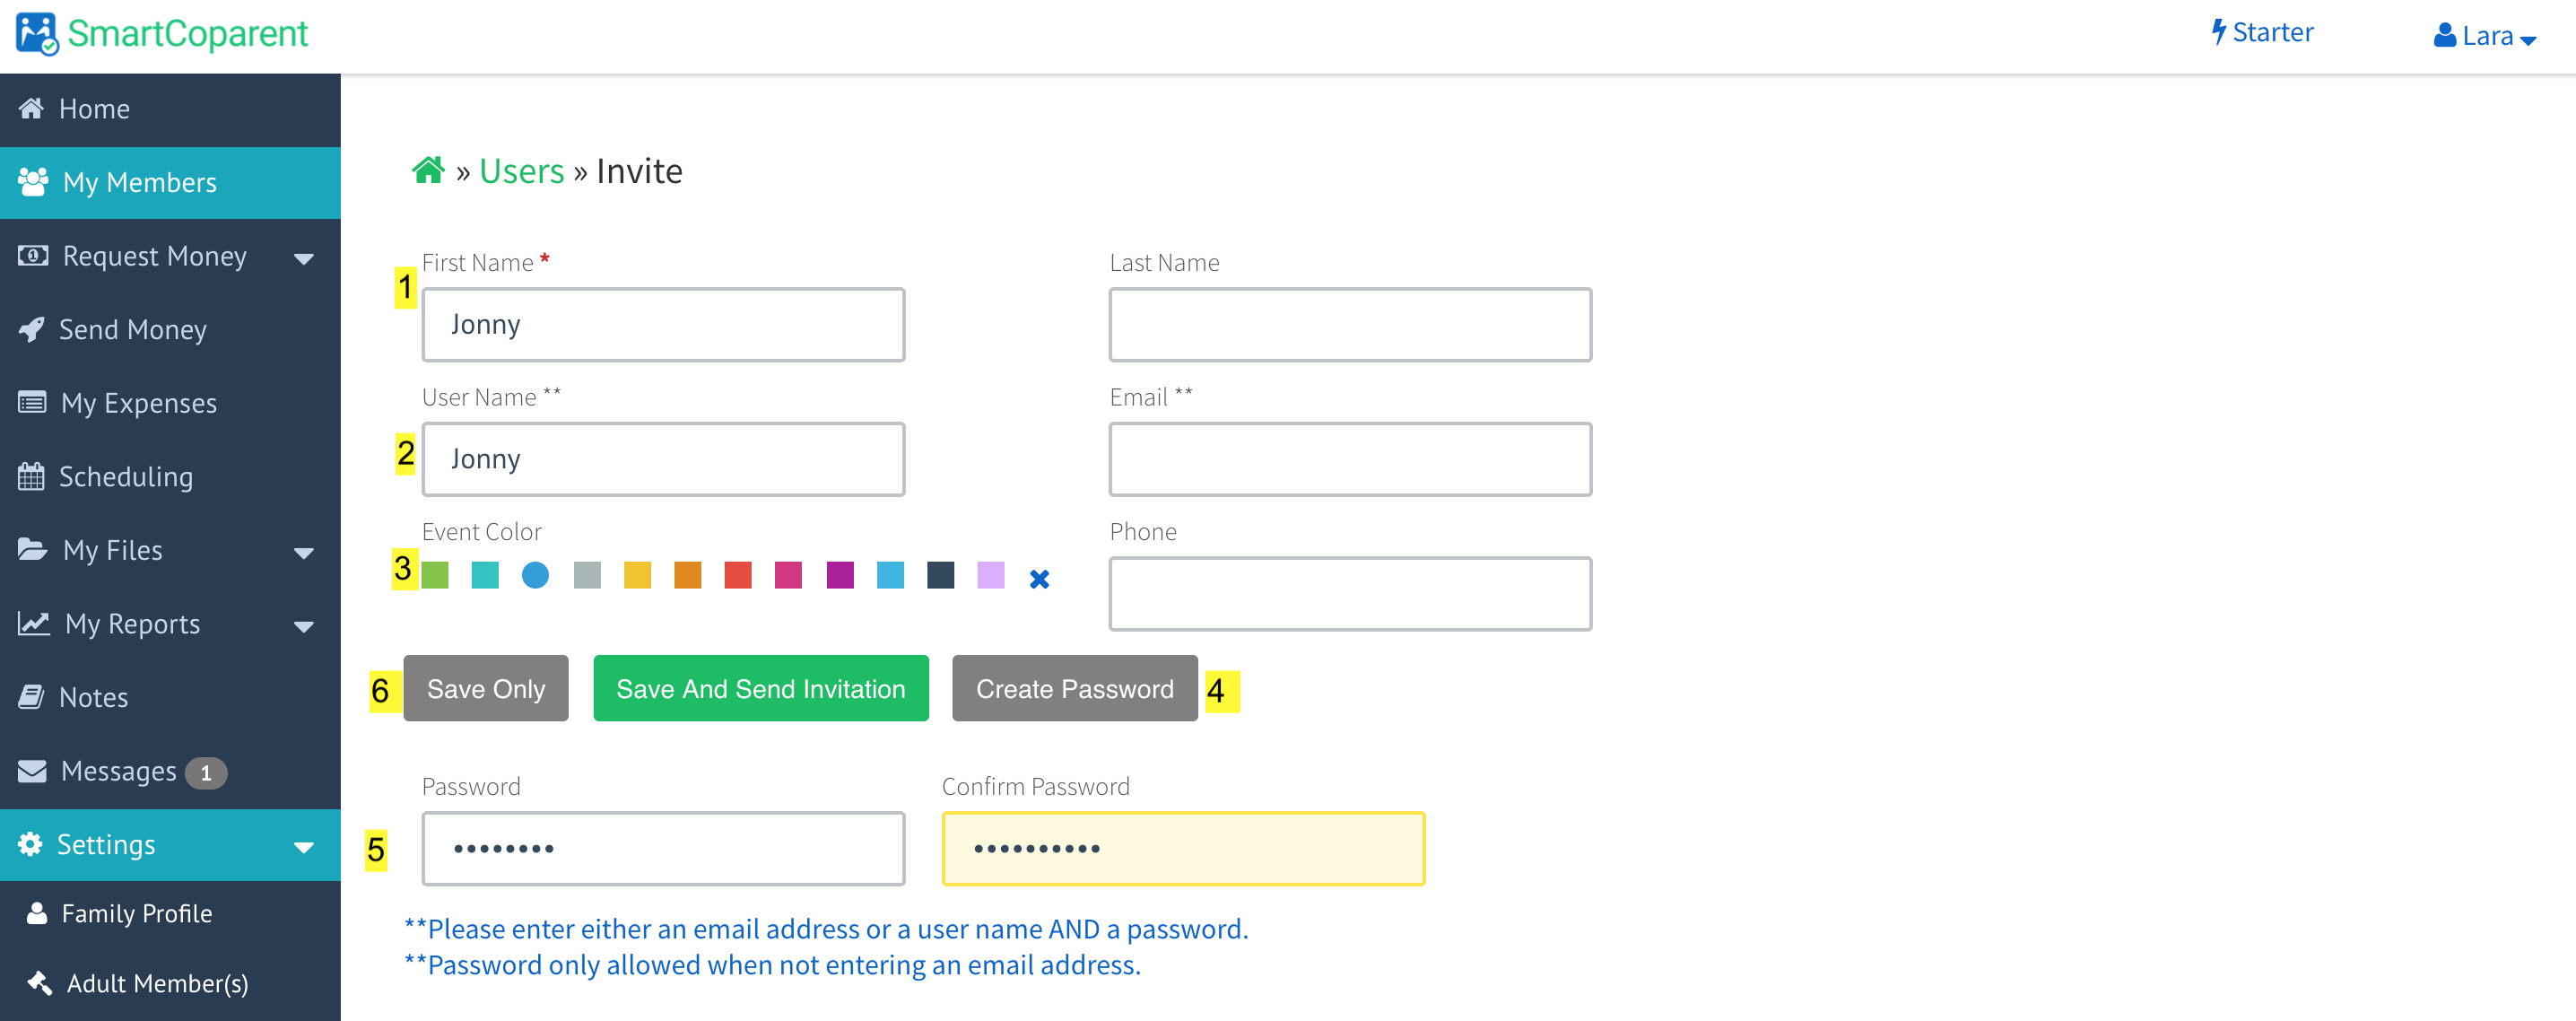
Go to the main menu => select ‘My Members’

Select ‘New Adult’ Button and add your first parent:

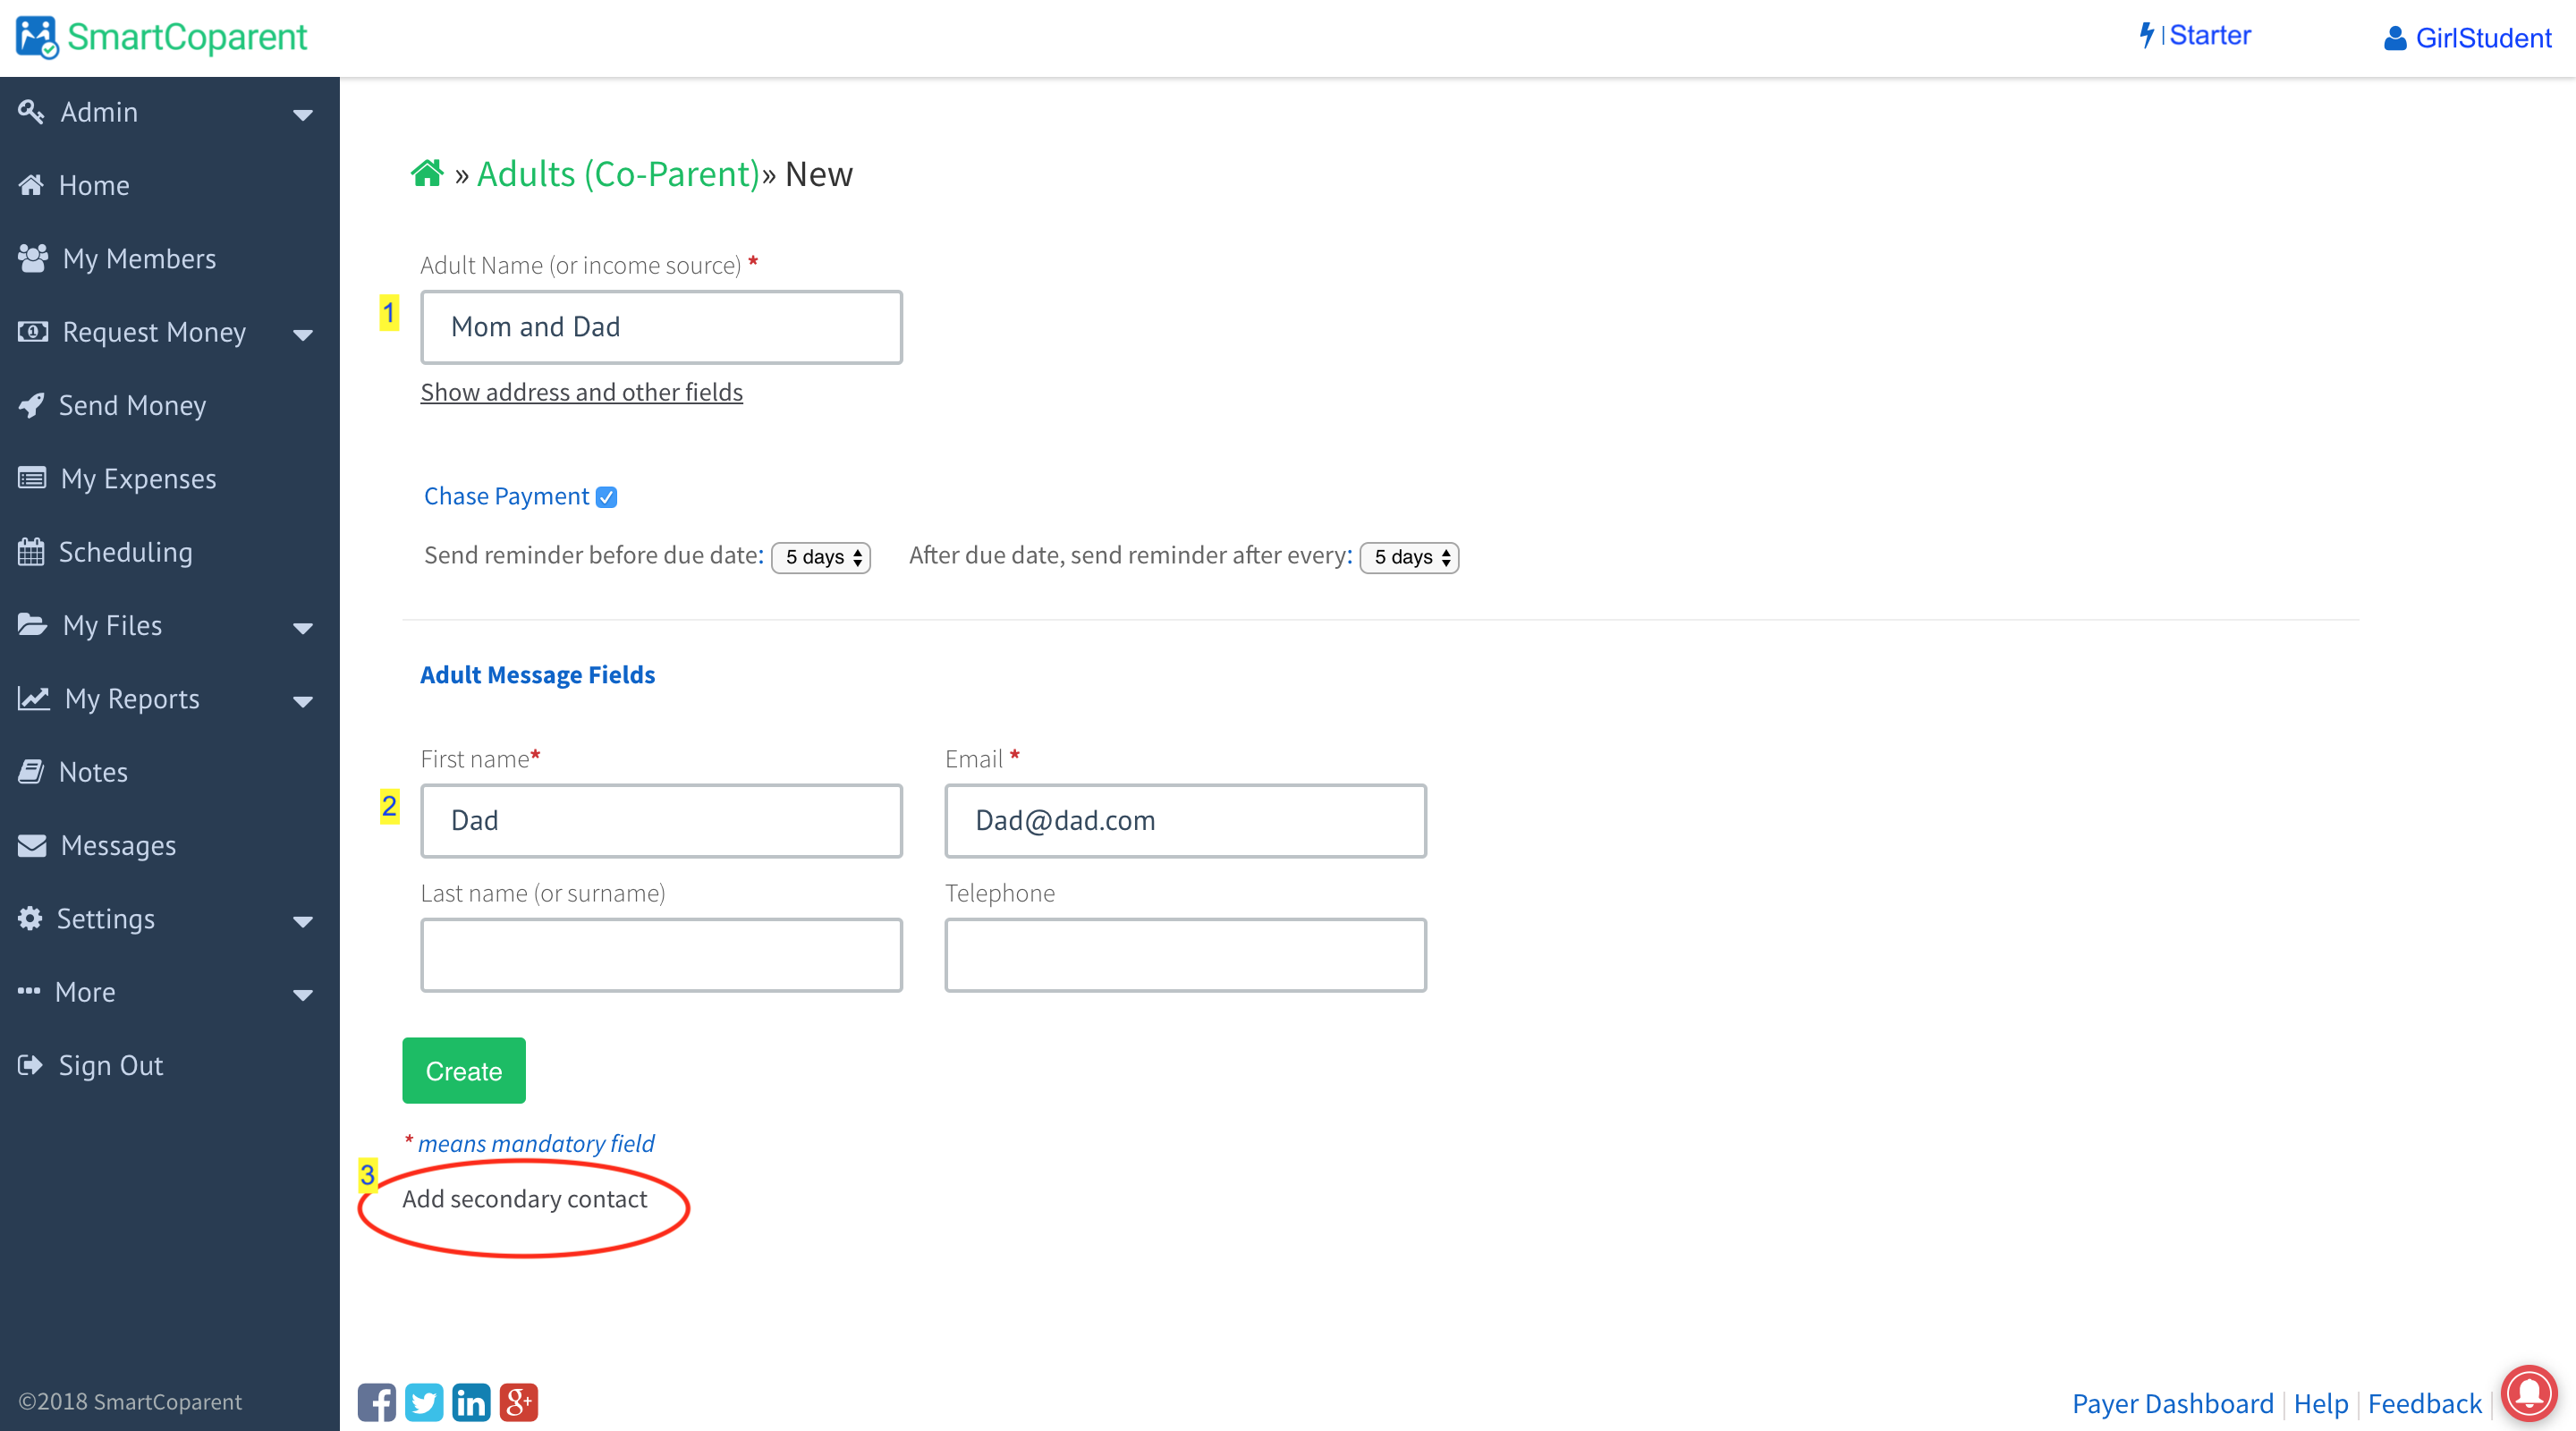
1. Create a common family name: we chose ‘Mom and Dad’ in the below example

2. Enter the non-custodial parent, or the primary payer first

3. Skip ‘Create’ button and select the ‘Add secondary contact’ field


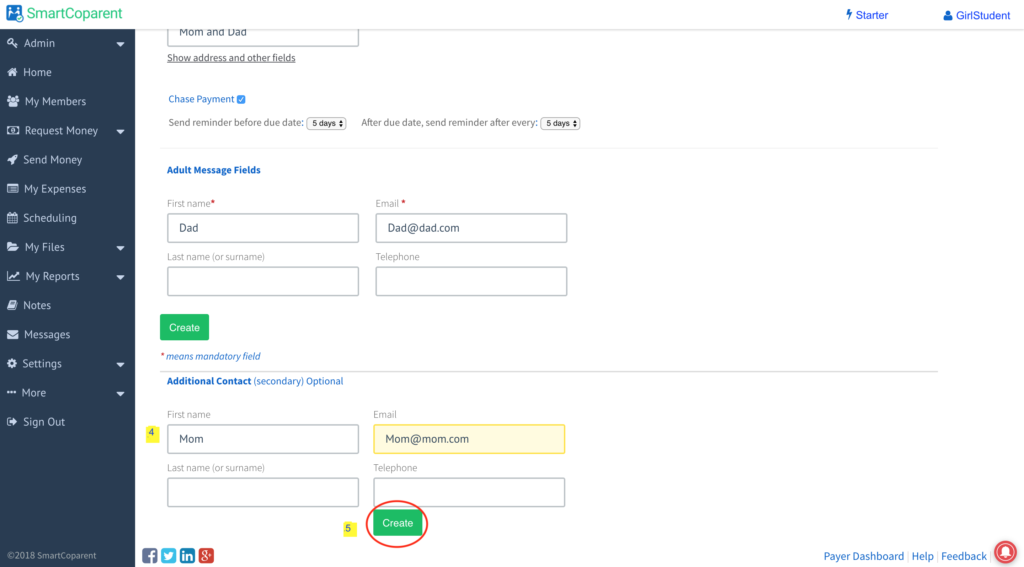
Now add your second parent:

4. Enter your other parent or payer in the next section.

5. Select the “Create” button on the bottom of the page


[/vc_toggle]


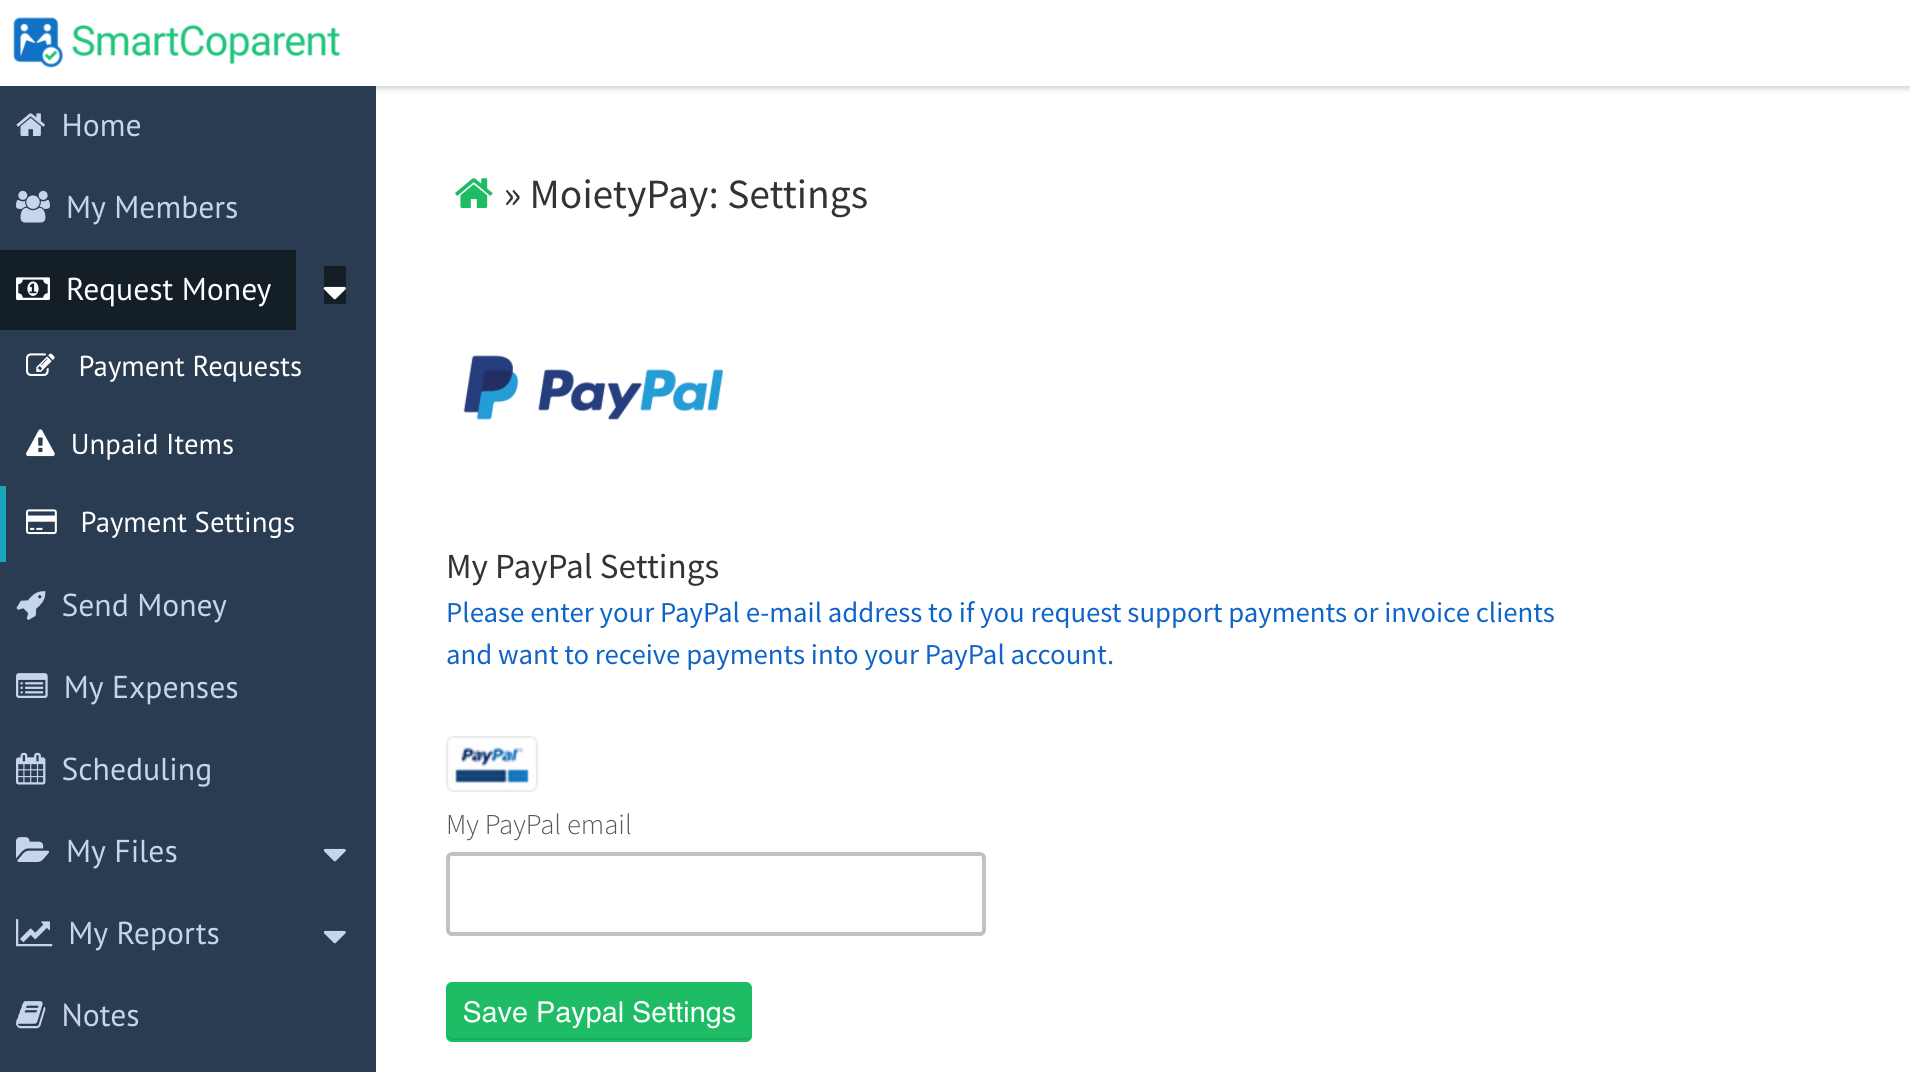
Setting up payment instructions, tracking and receiving payments on-line  (one-time setup)

On-line payments is a Premium feature. For those who do not wish to receive on-line payments, please skip this section.

[vc_toggle title=”Setting-up Payment Instructions” open=”false”]

For users who want to allow for payments to be paid and received on-line as well as tracking partial and full payments automatically, please upgrade to Premium subscription on our website at https://app.smartcoparent.com/subscription

Once your are subscribed to Premium, please follow these steps to allow for support payment requests:

Go to Request Money > Payment Settings

On this Page all you have to do is enter your PayPal email address. Either the student can enter their own PayPal address, or either parent’s PayPal address. All on-line payments will be paid to this account.

If you do not want to receive payments on-line, then simply do not enter any email address in the Payment Settings link.

PS: If you do not have a PayPal account, then you can sign up for them by clicking the below link.

Click here to Sign Up for PayPal

SmartCoParent does not charge any additional fees for making payments through PayPal.

PayPal does not charge fees within the U.S. to send money to family and friends when you use only your PayPal balance or bank account, or a combination of your PayPal balance and bank account.

PayPal does charge a fee to send money as a personal payment using a debit card or credit card and for international payments. To learn more about PayPal fees. please click here.

[/vc_toggle]


Creating 2-way or 3-way Expense Shares / Payment Requests (all subscription types)

[vc_toggle title=”Setting-up Expense Sharing” open=”false”]

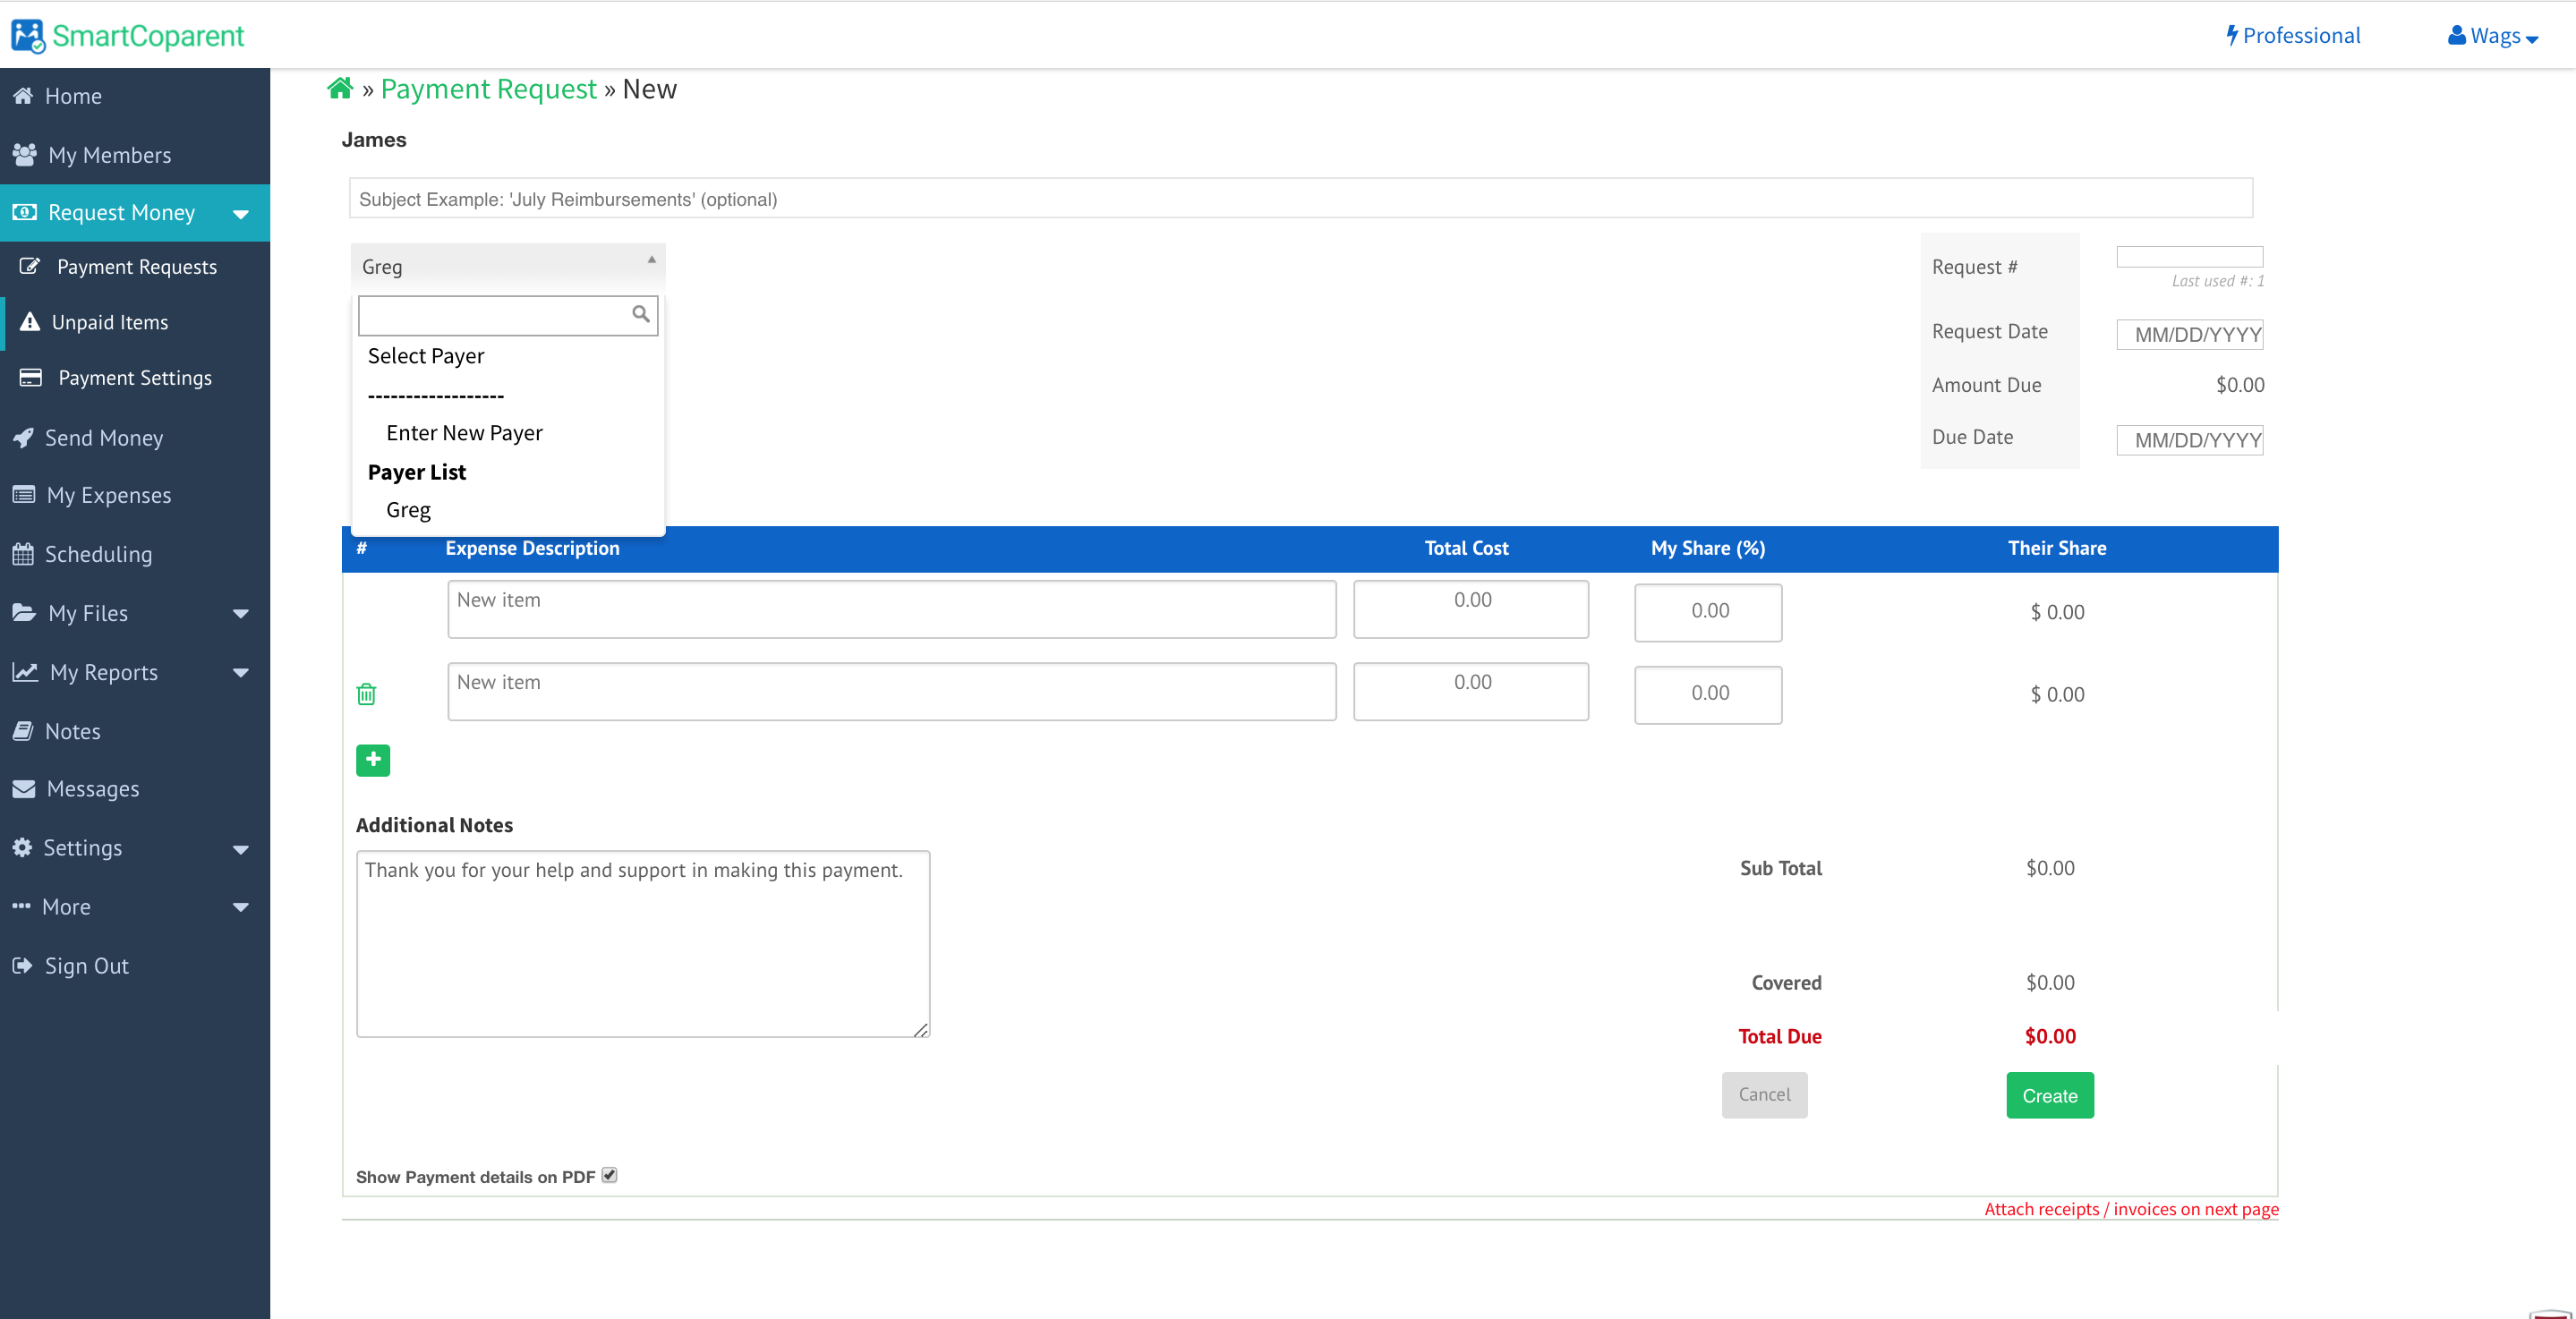
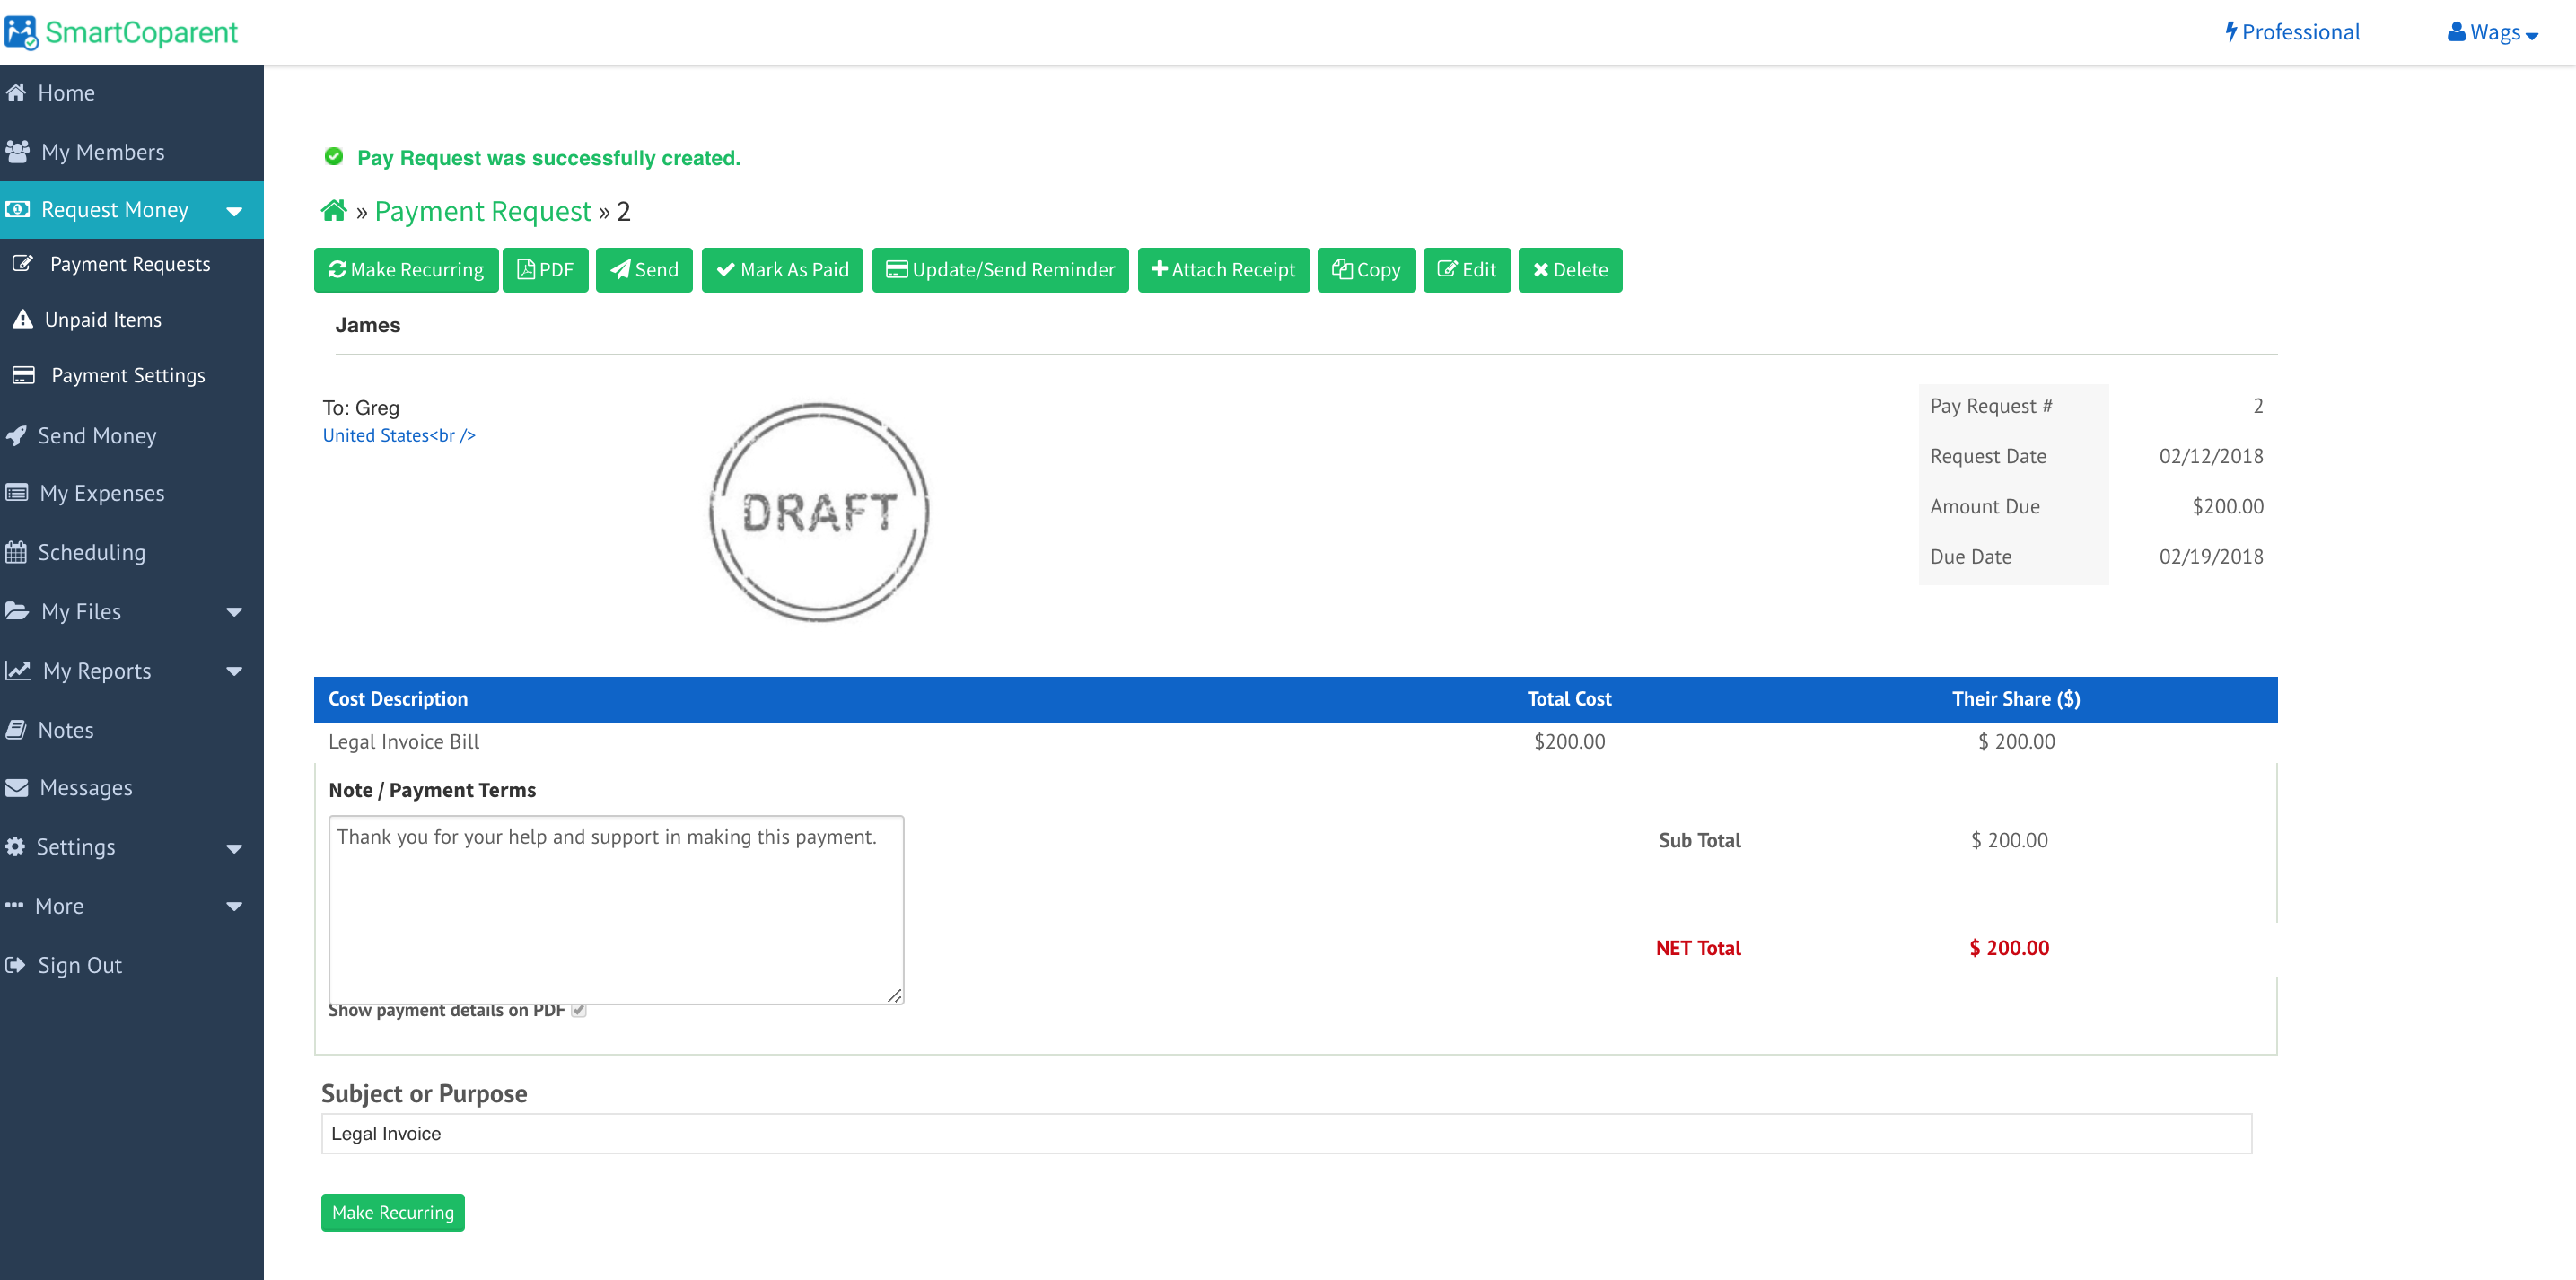
Here is how your student can share all of the miscellaneous college costs with both co-parents simultaneously:

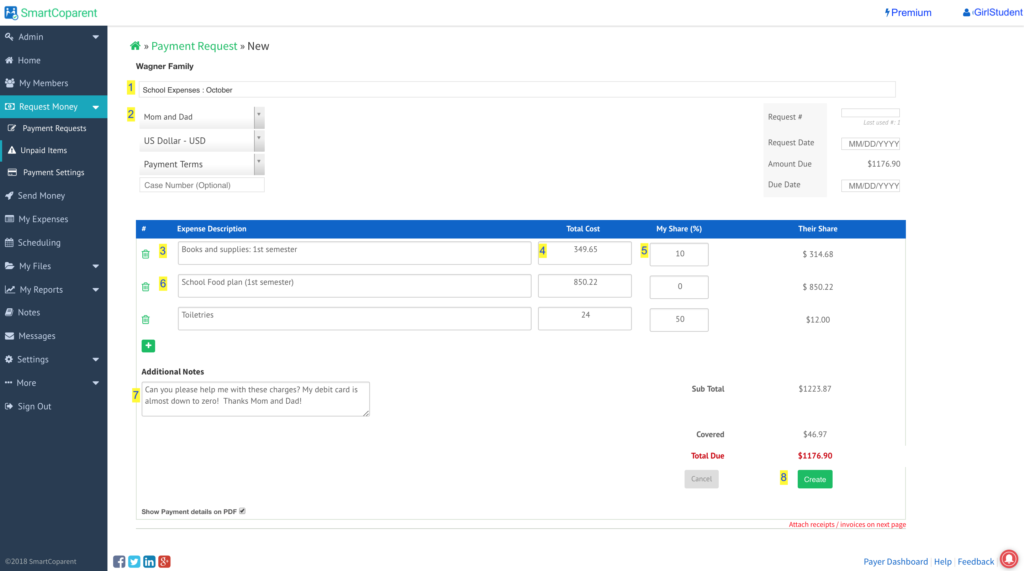
Click on the Request Money option in the Navigation Menu

Then click on the Payment Request link.

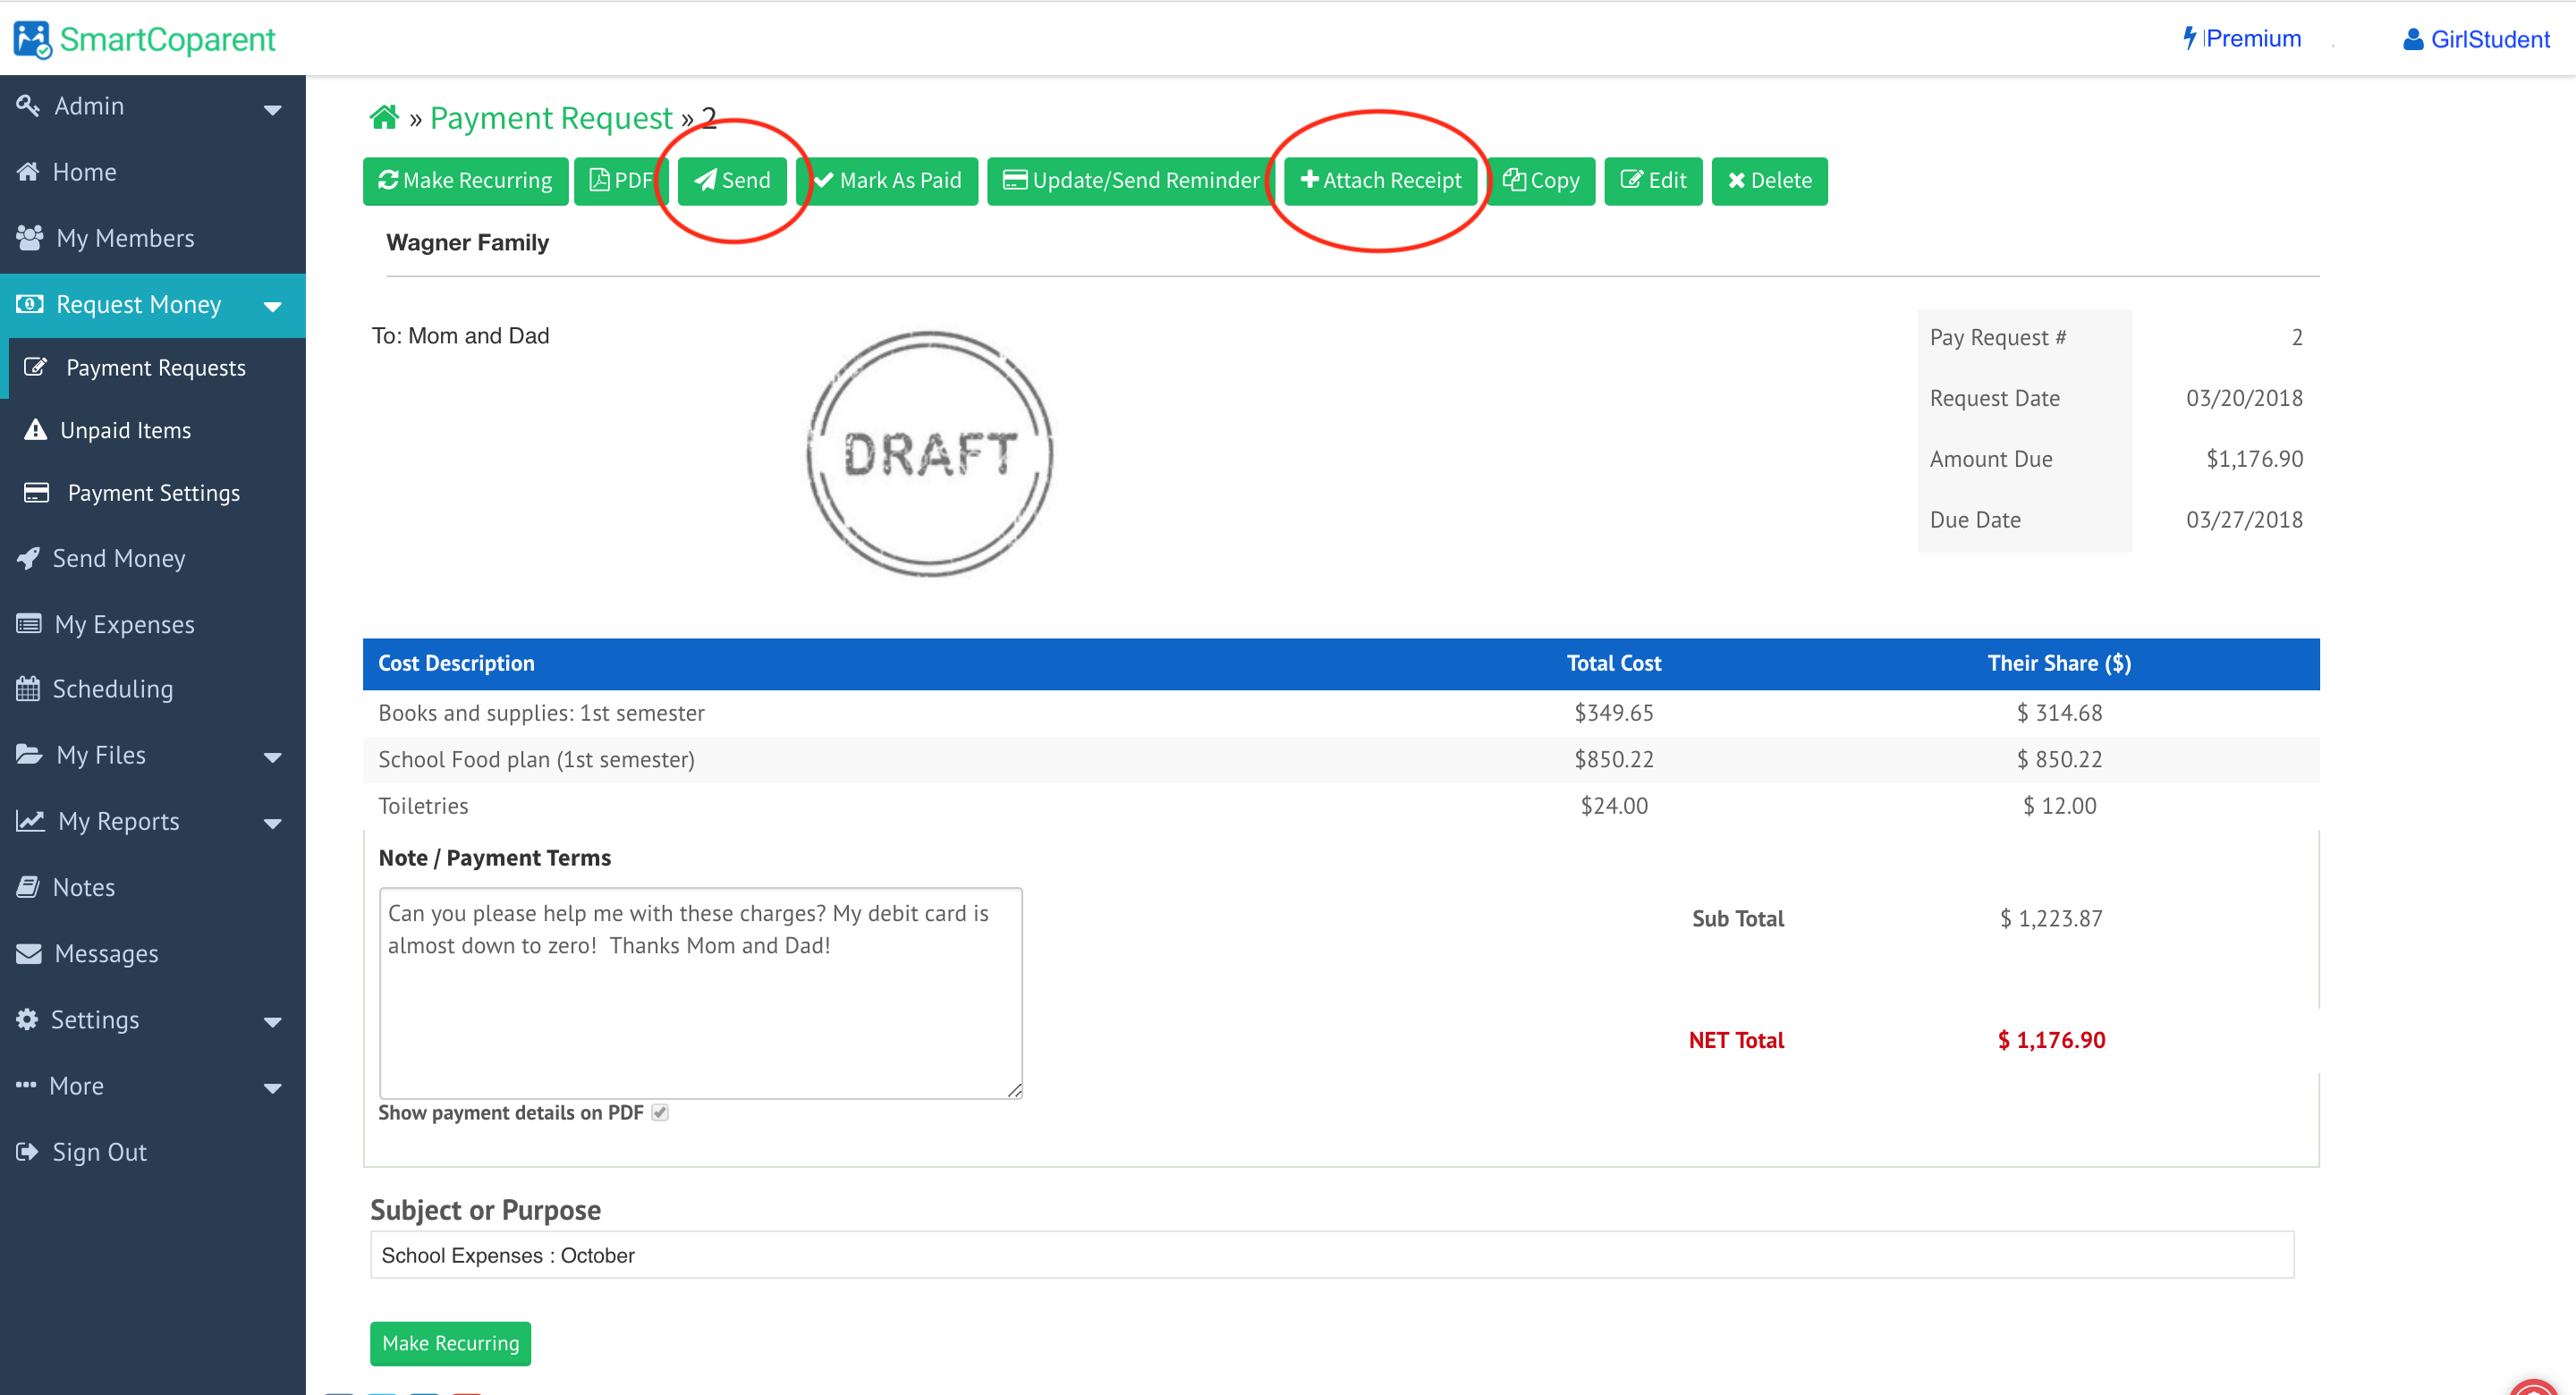
Now your student can create expense shares / payment requests:


1. Enter the subject of the expense request (‘October School Expenses’ as an example.

2. Student selects the ‘Mom an Dad’ account as ‘payers’

3. The description of the first expense

4. The total cost of the expense

5. The percent amount the student will contribute to the expense, if any (‘my share’). Leave as zero if student is not sharing any costs

6. Any additional expenses on the next lines

7. Additional notes your student would like to add or change on the expense share.

8. Select ‘Create’ at the bottom of the page. This creates a ‘Draft’ of the expense share.

  • Note: student can add receipts on the next page.
  • Note: your student has not shared the request after selecting ‘Create’. He or she can review the request before sending to the parents.


[/vc_toggle]


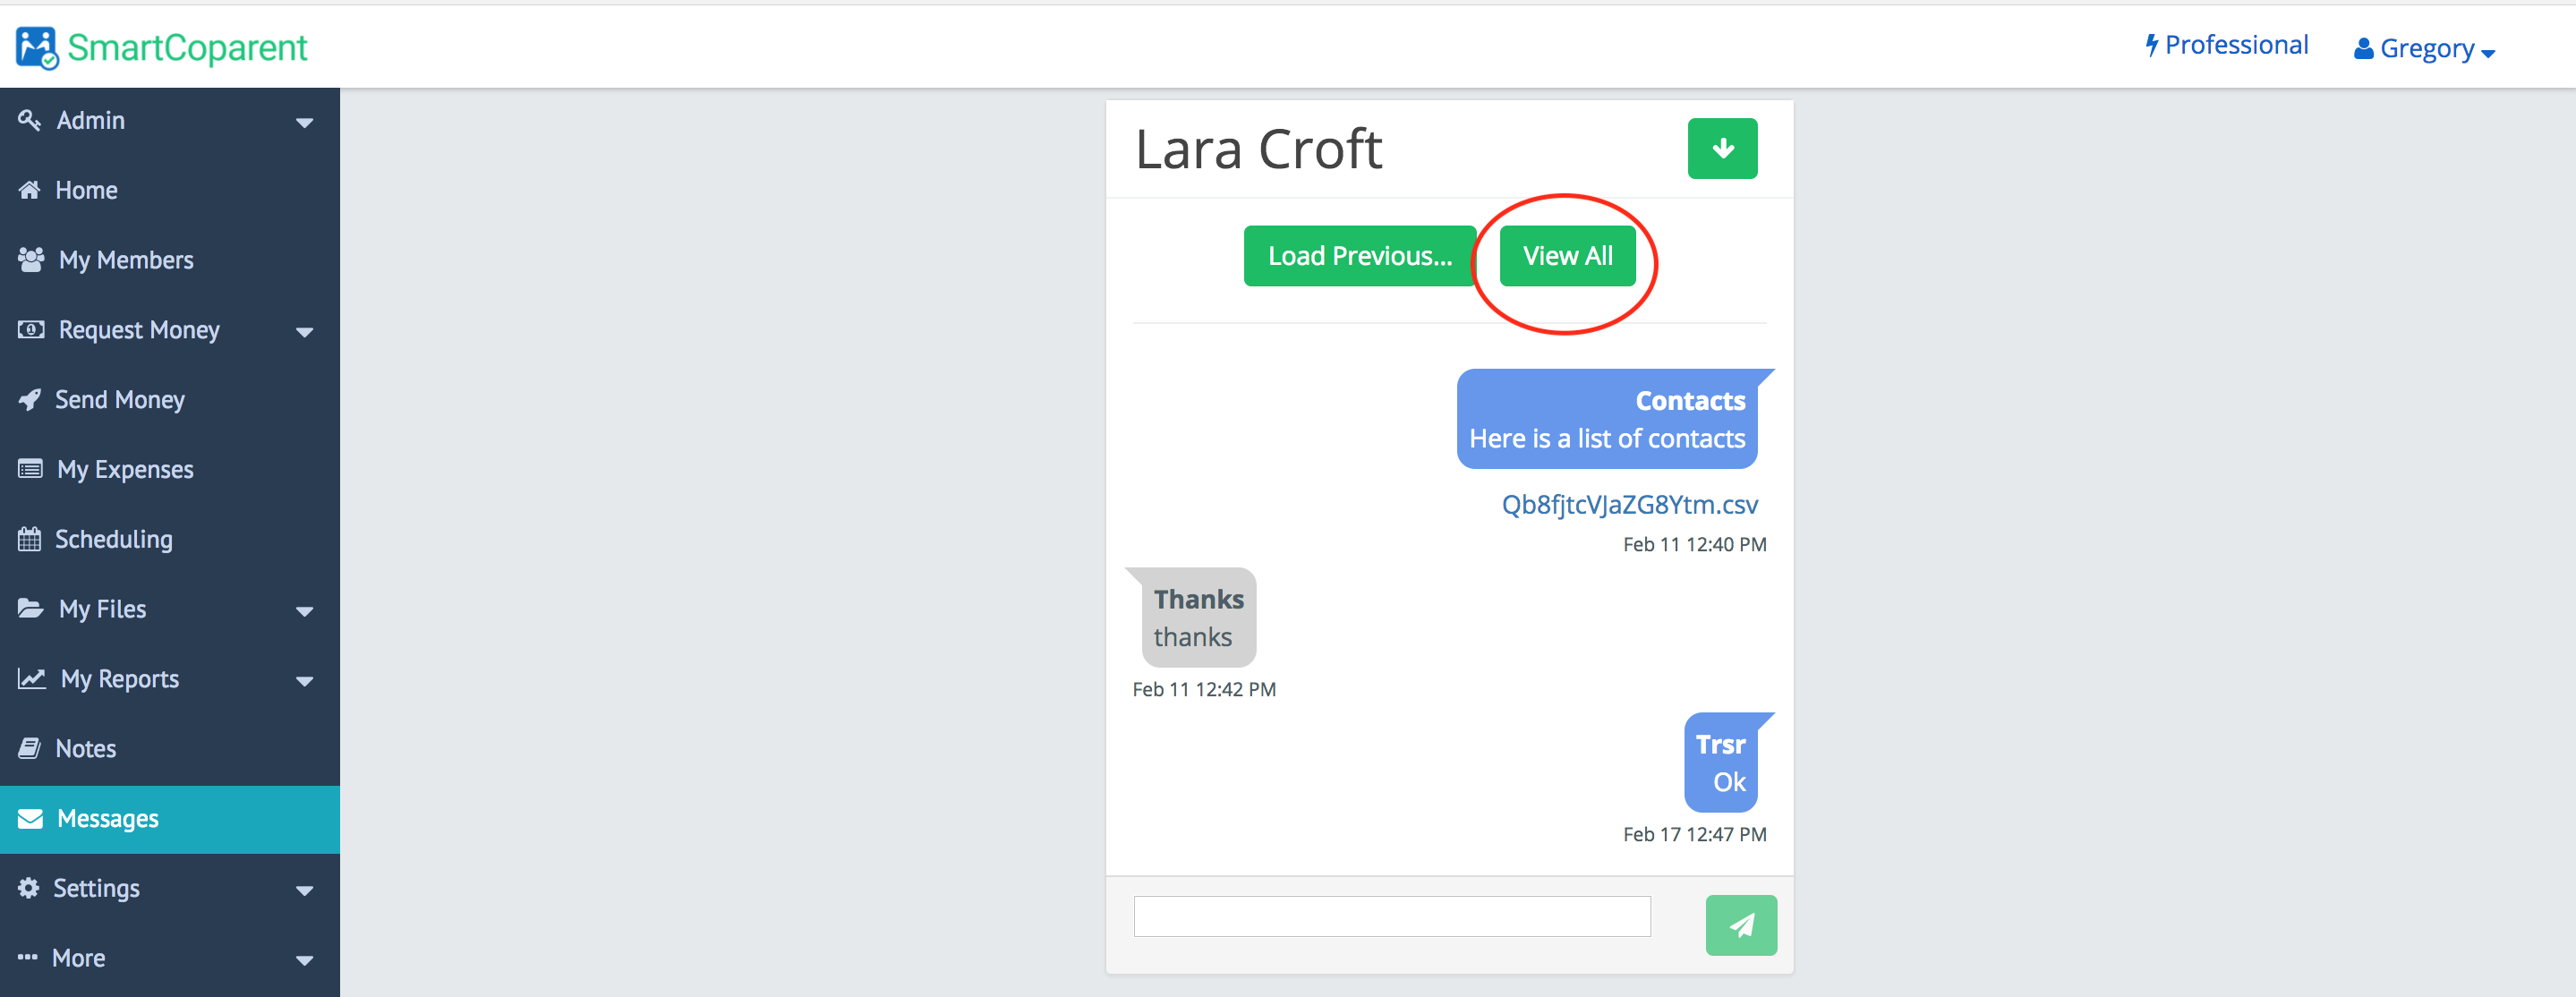
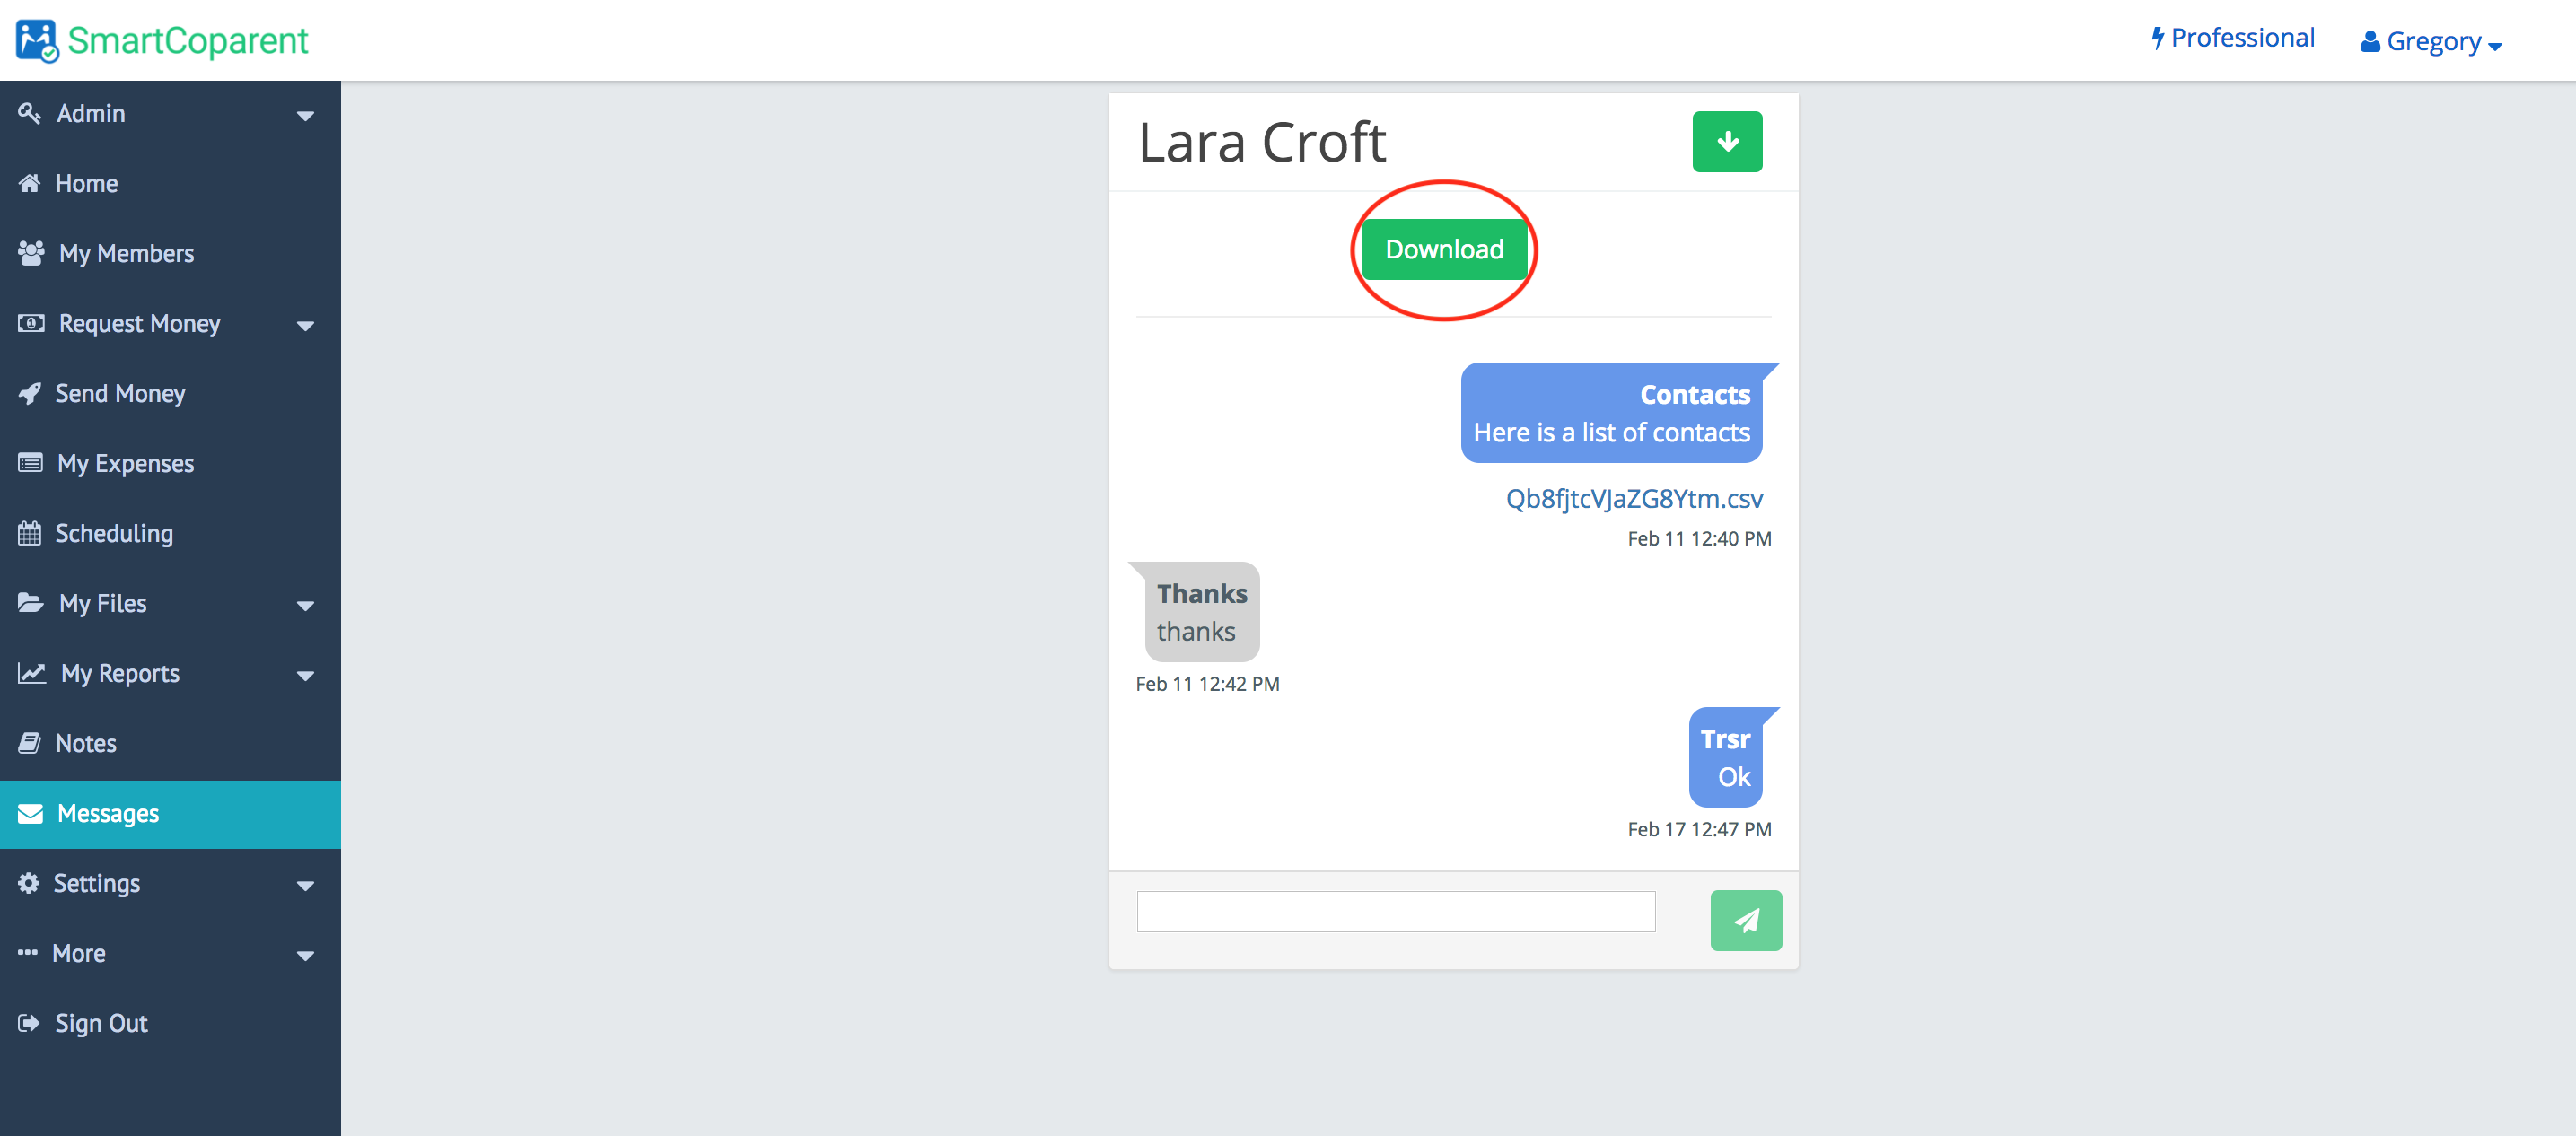
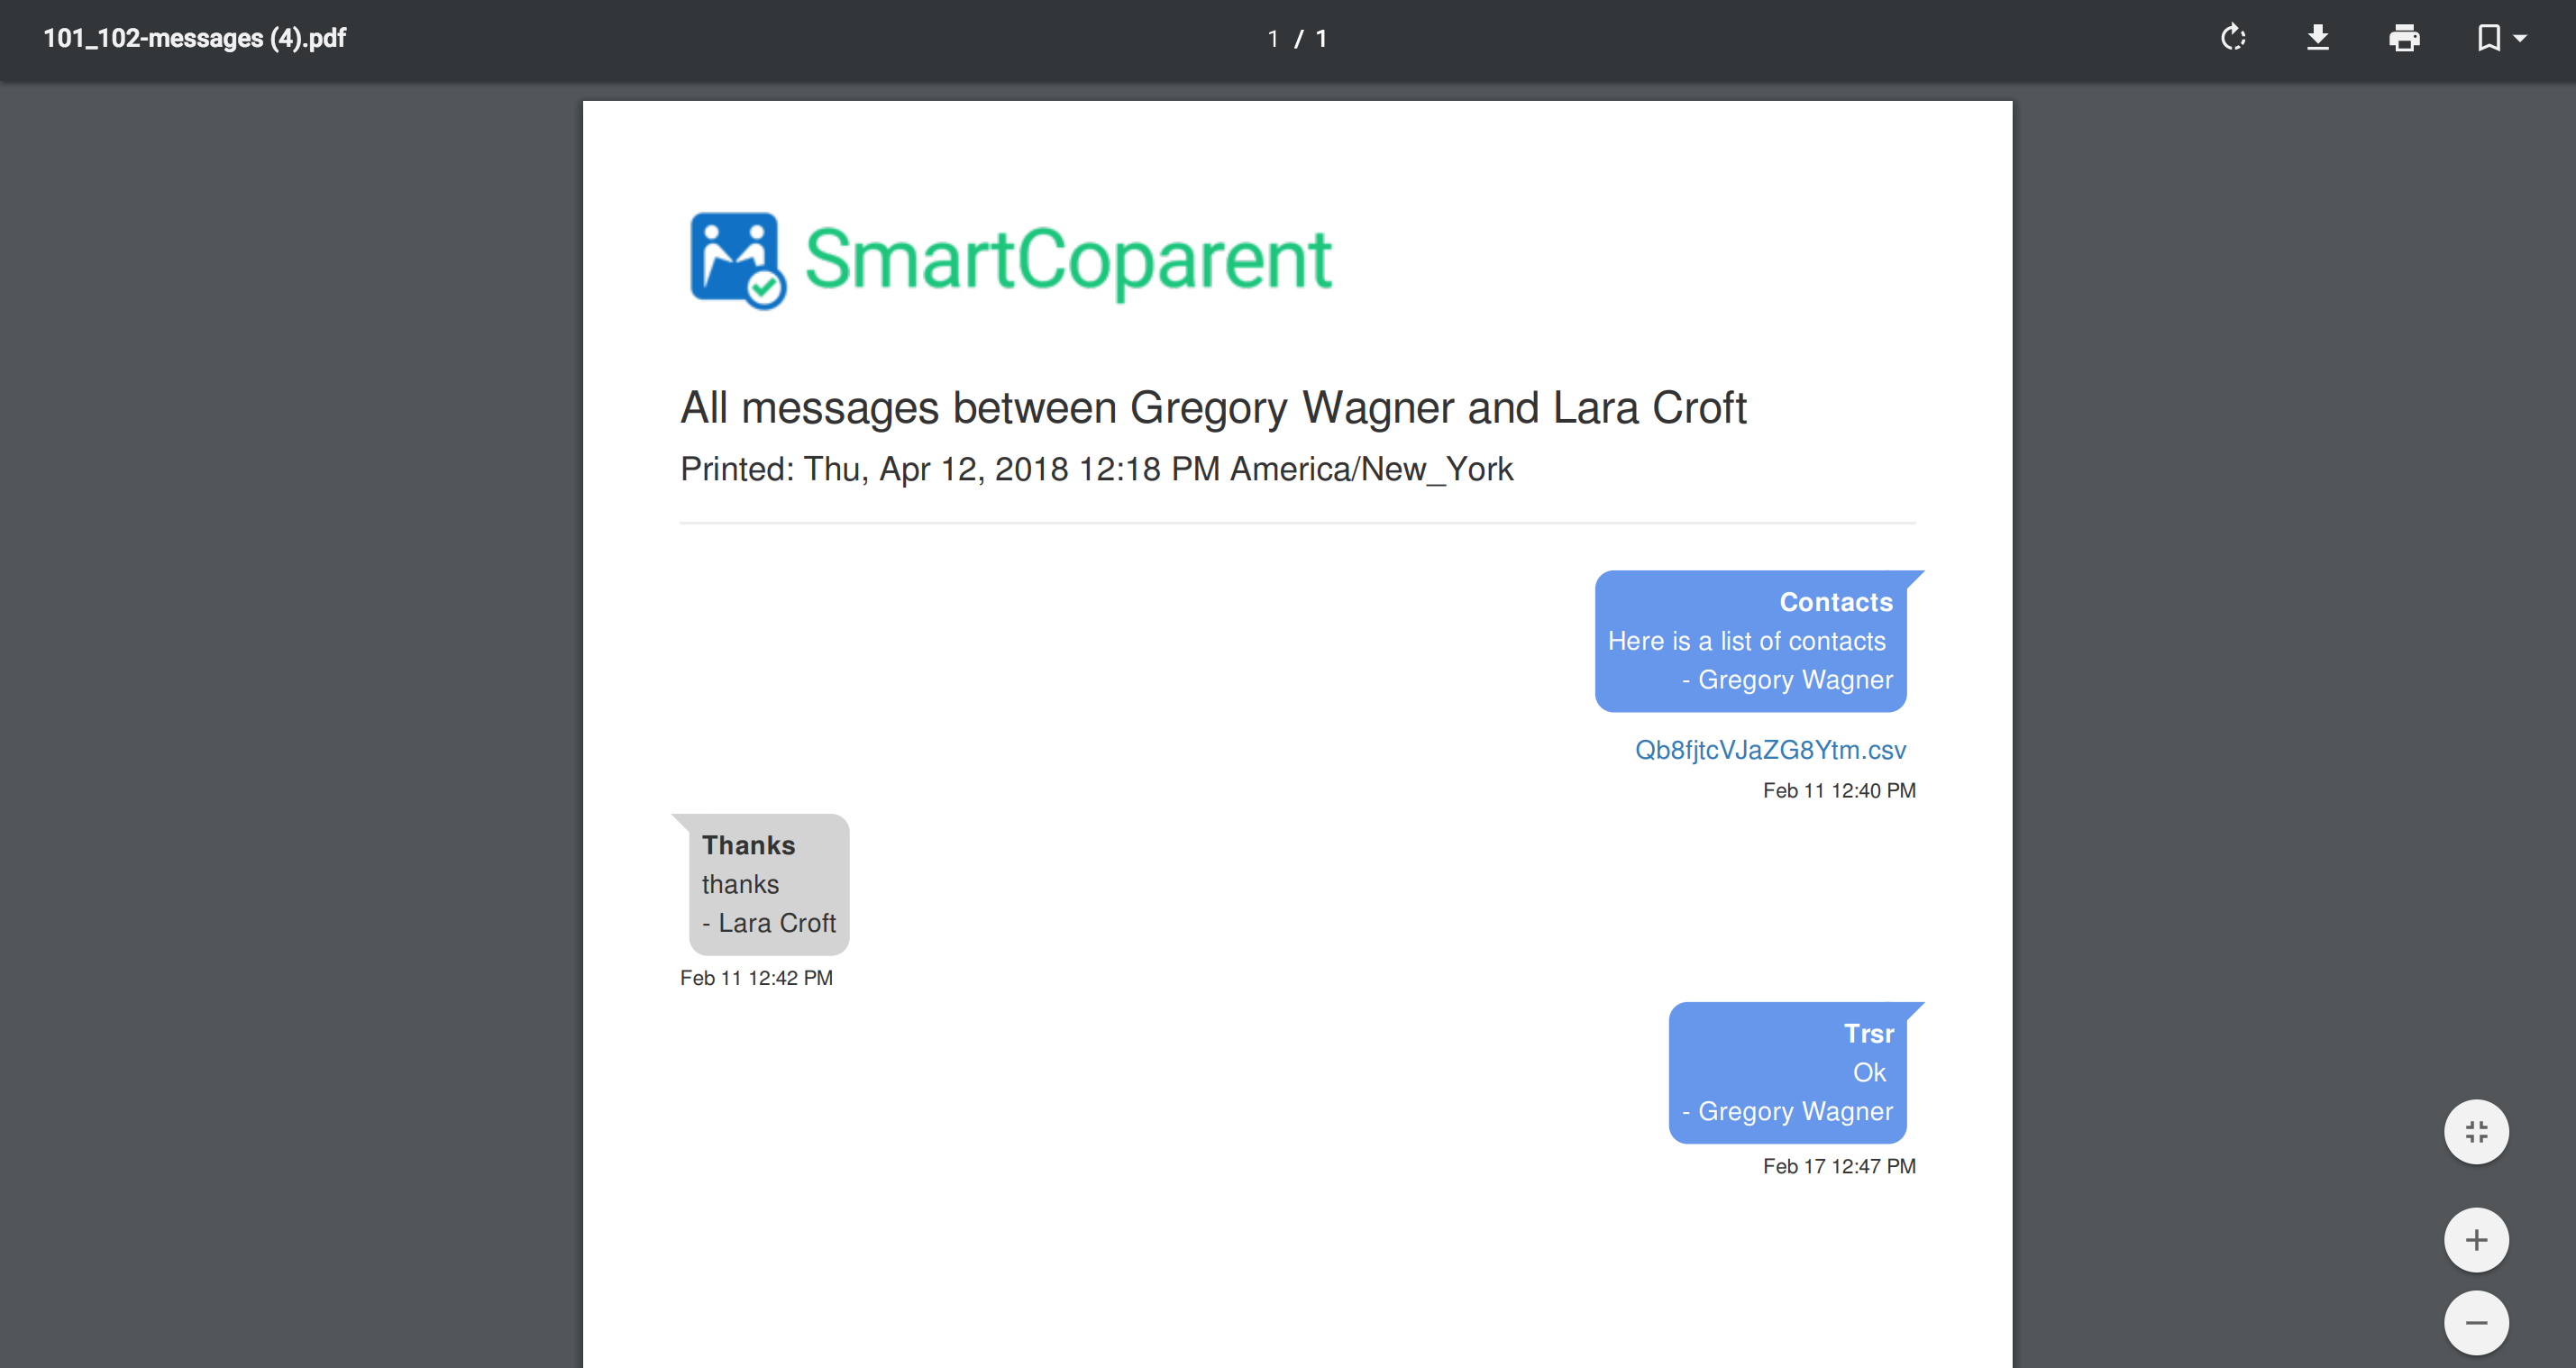
Adding Receipts and Sending Expense Shares to Both Parents

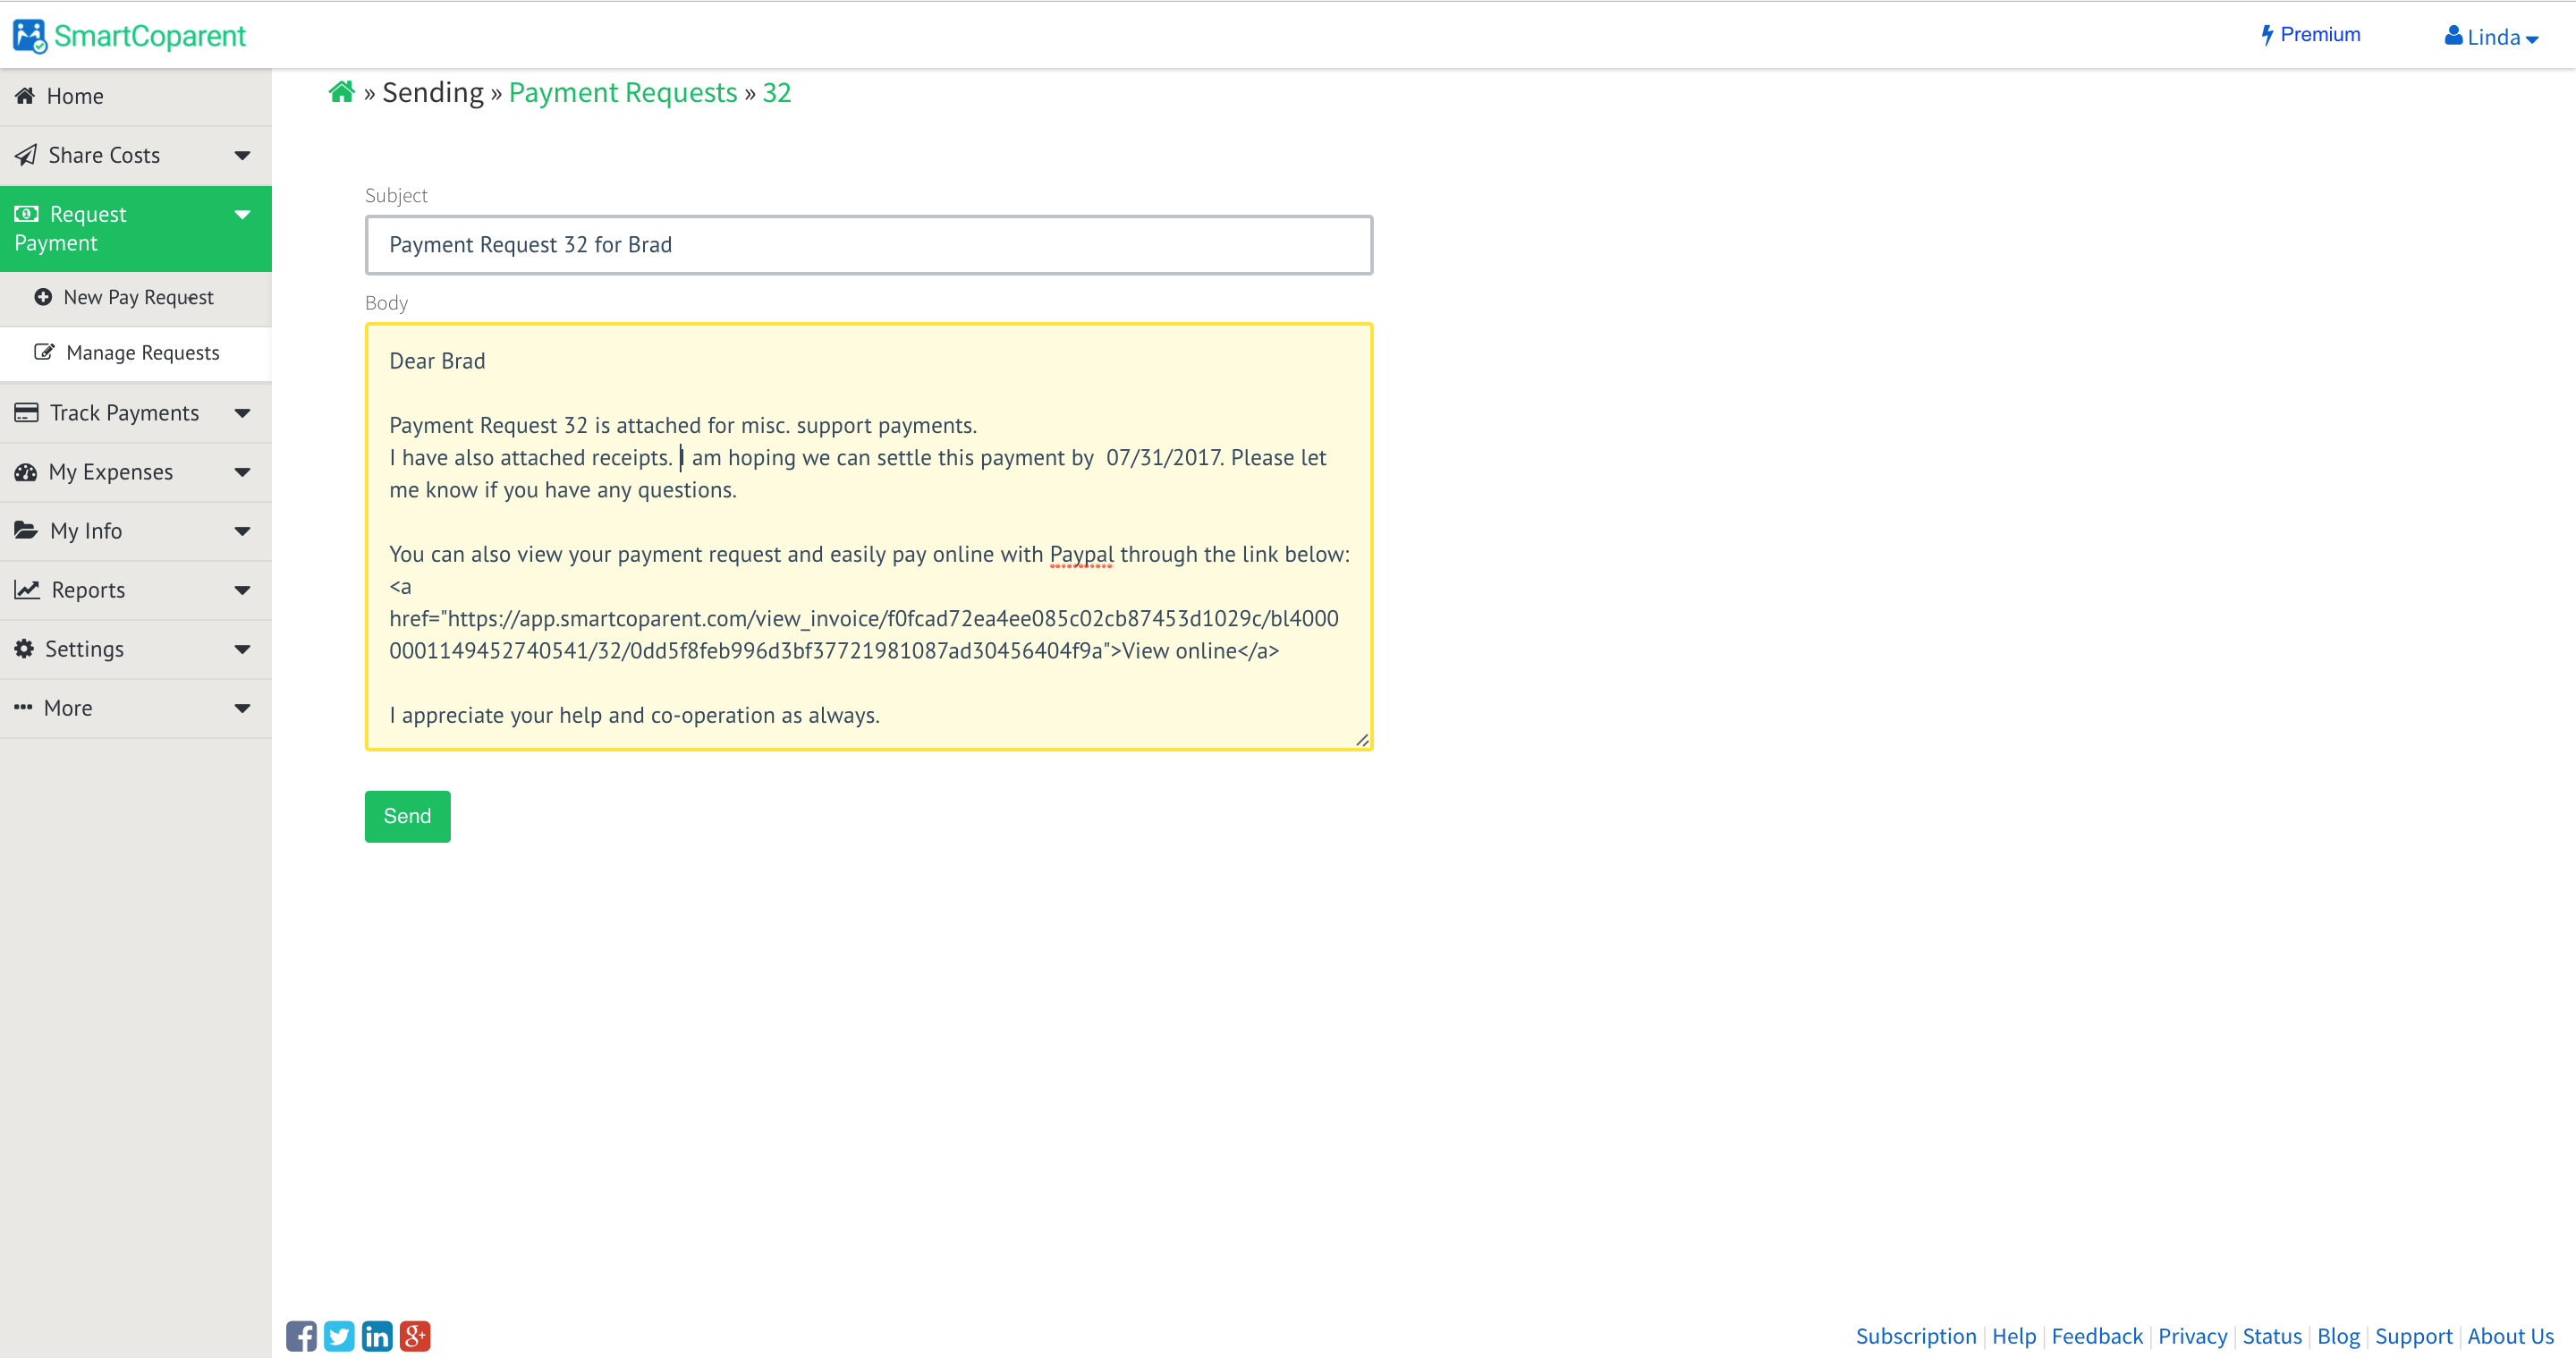
[vc_toggle title=”Sending Expense Sharing” open=”false”]

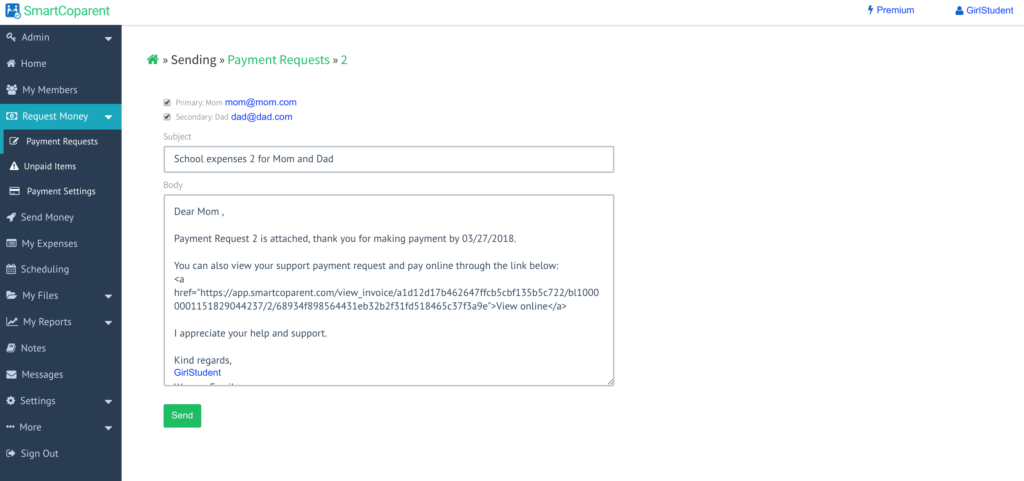
In the next screen you can:

  • Attach receipts to your Support Payment Request.
  • Click ‘Send’ to generate an automatic email of the payment request to your co-parent / payer.

Note: The Payment Request remains in Draft status until the ‘Send’ button is clicked to send the invoice to the payer.

[/vc_toggle]


Parents Paying Expenses

[vc_toggle title=”Parent Expense Shared Payments” open=”false”]

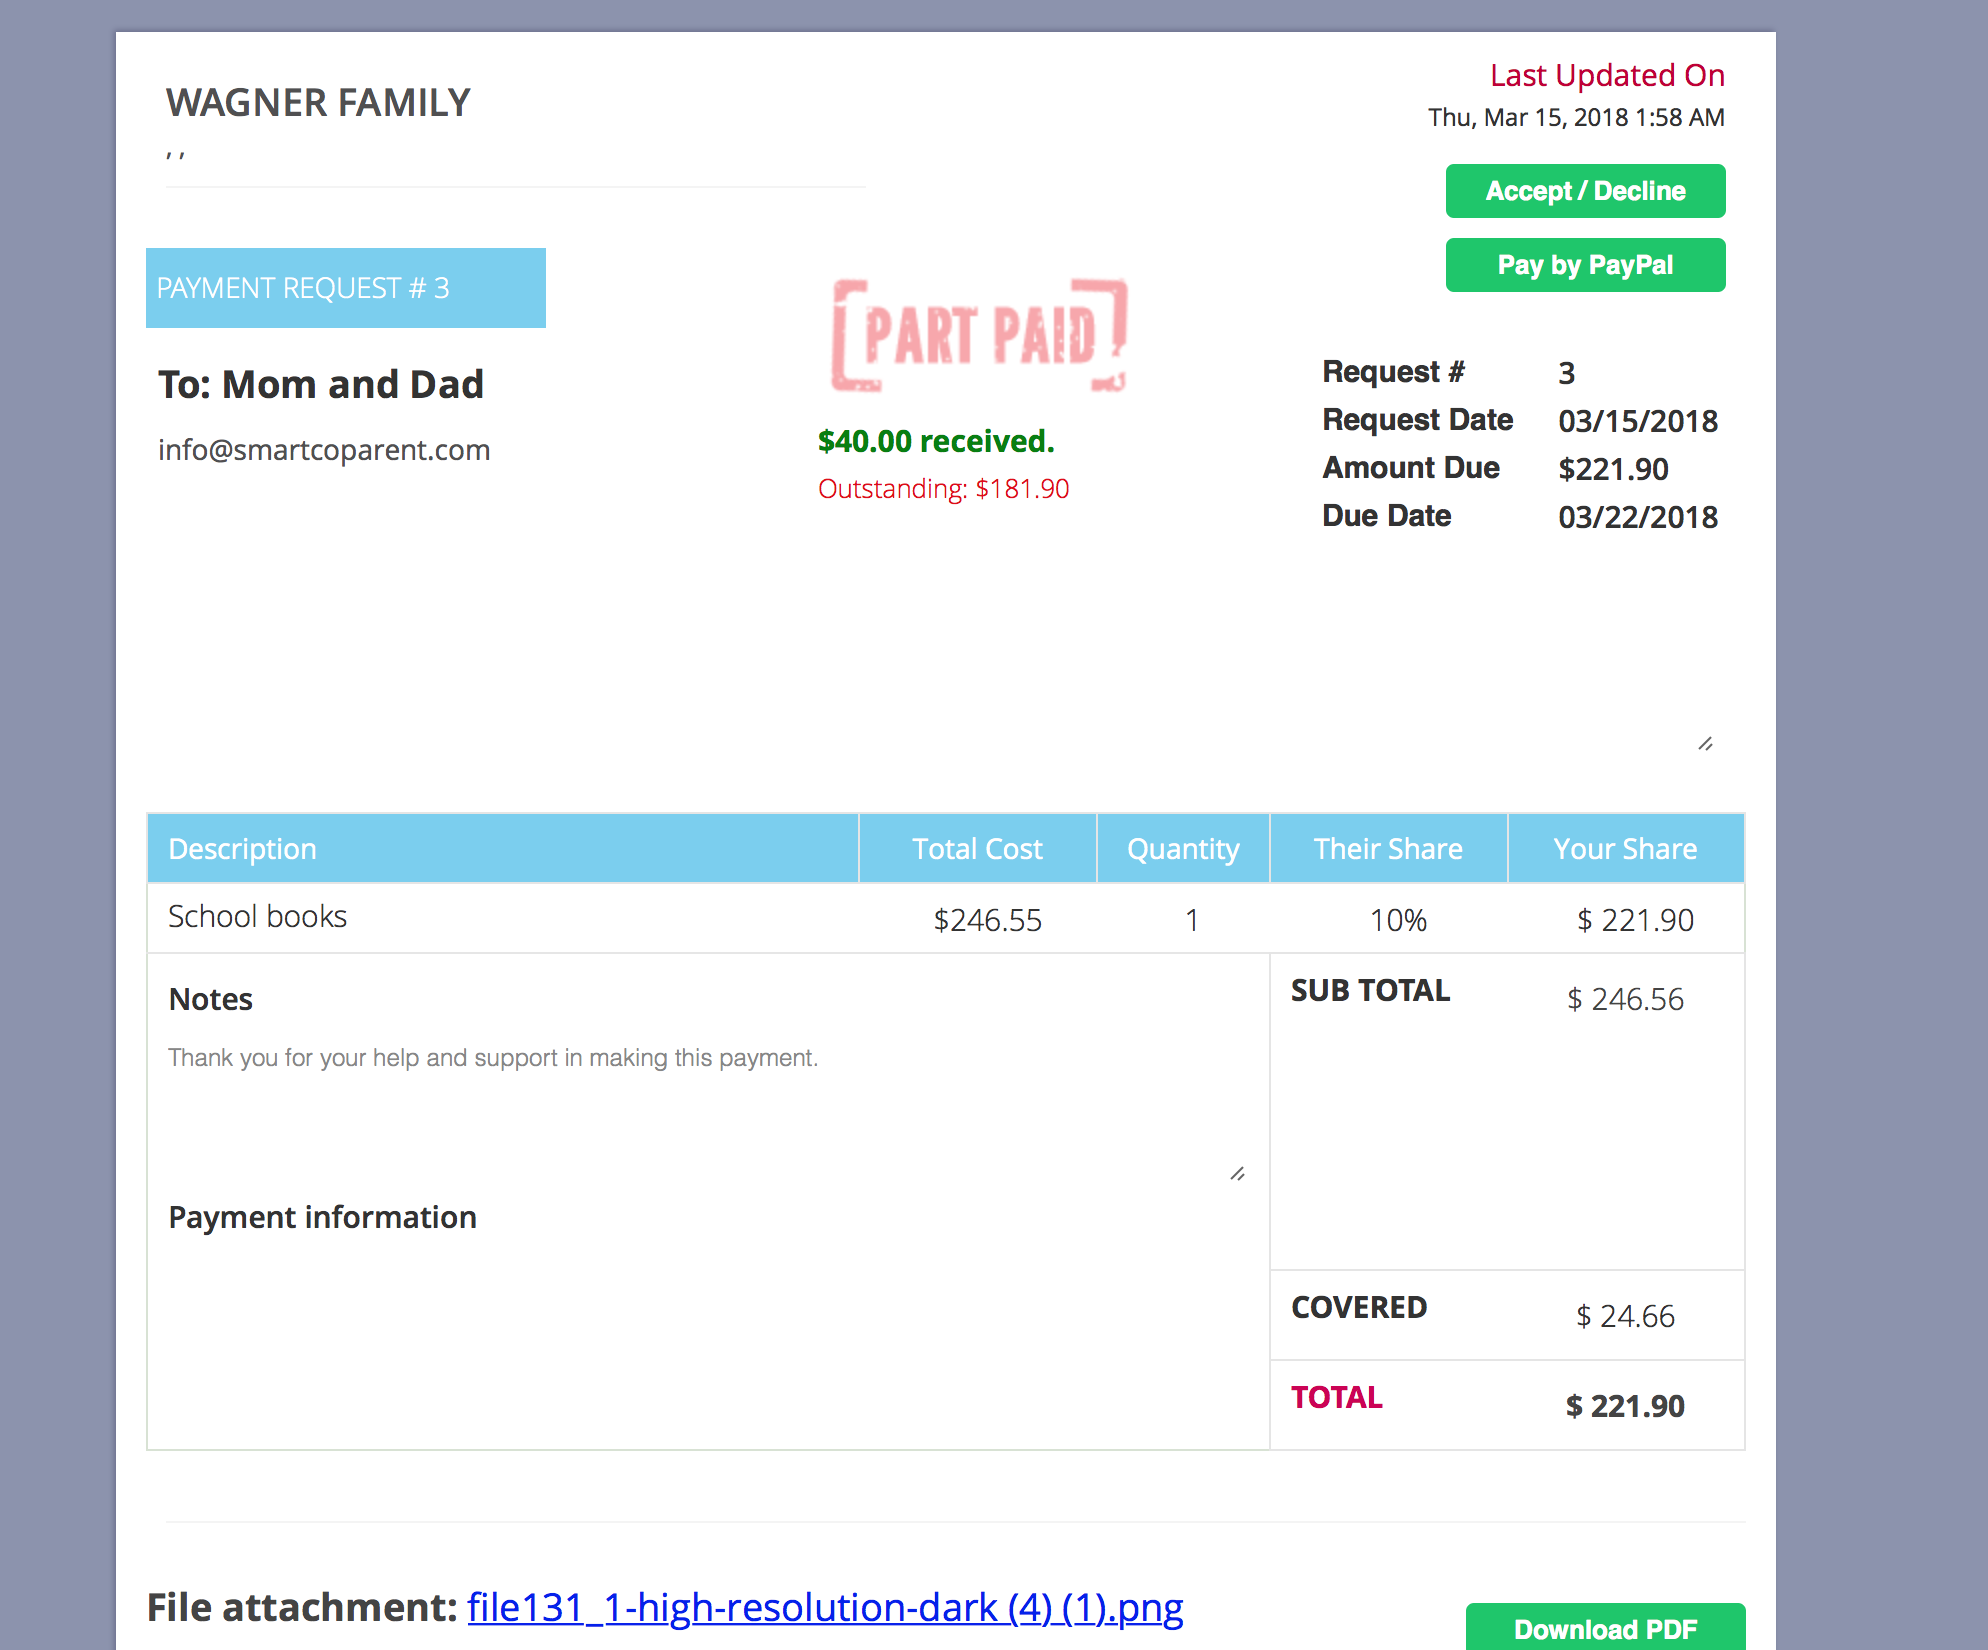
Both parents will receive the expense share on their respective e-mails. They can view the expenses, as well as any receipts that the student attached.

If the student has selected a Premium account, both parents can pay-online.

SmartCoparent prevents expense requests from being over-paid. if one co-parent has made a partial payment, the other co-parent will only be able to pay up to the remaining amount left of the expense share. See below sample.

[/vc_toggle]

That’s it. Your student can send regular expense payment requests. Each request should take no more that 1-2 minutes of their time.


If you have any questions, please do not hesitate to contact us at support@smartcoparent.com. We’re here.


How Do I Share my SmartCoparent Calendar to a Non-Subscriber?

You can share your co-parenting calendar to anyone, even if they aren’t subscribers to SmartCoparent.

It’s important to note that print functions are generally not used in mobile apps. To print any SmartCoparent report or calendar, please login to your account on your laptop, PC or mobile device at https://app.smartcoparent.com.

Here’s how:

  • Login to your account
  • Go to the main menu, select ‘Schedule’
  • Select the current month or any other month you want to share
  • Check to make sure that you have removed any events that you wish not to share.
  • Select ‘Print’ on the upper right hand corner


When your print options display, go to ‘Destination’

  • Select ‘PDF’
  • Select Portrait Layout
  • Select ‘Save’


Your PDF will be downloaded on your personal drive on your PC or your mobile drive on your mobile device. Send your PDF calendar to anyone from your personal e-mail or text account.


If you have any further questions, please send us a note at support@smartcoparent.com


My Child Is Only Three Years Old. Do I Really Need To Setup Her As A Member?

Answer: No need.

If you have no intention of having your child participate in the calendar or chat process, i.e. they can’t read yet :-), there is no need to set the child up as a member.


To create events that help you and your co-parent follow child events (day care, babysitter, birthdays, etc..) simply do the following:

  • Go to the left menu and select ‘Scheduling’
  • Select ‘Add Event’
  • Enter event details (title, description, start date & time, end date & time)
  • Skip the ‘Assign To’ section
  • In the ‘Share With’ section select your co-parent or anyone who you want to get notifications of this event
  • Select a unique ‘Customized Event Color’

That’s it. Your event is setup. Anyone you shared the event with will be able to see the event and it’s details on their calendar.

The unique event color will help distinguish this event as a child event for you and your co-parent.


If you have any questions, please don’t hesitate to contact us at support@smartcoparent.com.

My Child Doesn’t Have An E-Mail Address. Can She / He Still Use The App?

Your child can still use the app to view calendar events and chat with family members, even if she or he does not have an e-mail address:


A) To setup a child account without an e-mail address, follow these steps:

  • On the side menu, go to ‘My members’, select the ‘New Child’ button
  • Enter a name where it says ‘First Name’
  • Enter a username (keep this somewhere safe)
  • Skip the ‘Email’ section
  • Select a unique event color for your kiddo
  • Select the ‘Create Password’ button
  • Enter a password (keep this somewhere safe)
  • Select the ‘Save Only’ button


That’s it! The child account is setup!


B) To share the information with your child, have them login to the application with the username and password you created:


Your child will only have access to the calendar and chat functions. All financial functions are blocked.


If you have any questions, feel free to contact us at support@smartcoparent.com


How Do I Create A Preliminary Visitation Calendar For My Clients

In order to easily create a preliminary visitation calendar, we recommend the following…


Once your account is upgraded to Pro, follow these steps:

  1. Invite your client and or perhaps your client’s legal counsel to join your SmartCoparent account:
    1. Select Members > Add Adult
    2. Enter your client details, select ‘Save and Send’. Once your invitees have accepted, you can create a preliminary calendar
  2. Go to the menu , select ‘Scheduling’
  3. Create calendar events. Enter the event details: Title (i.e. ‘Preliminary visitation schedule’), Description (if any), Date (required) and specific Time (if any). To make sure the event occurs overnight, make sure the event is scheduled for more than 24 hours.
  4. ‘Assign’ visitation to the non-custodial parent. If they are not a member of your group, simply skip the assignee and assign an event color that will be designated as unique to the non-custodial parent.
  5. Share with your client and or client legal counsel.

Negotiating final settlement of calendar dates can be conducted on messaging between you and any member you invited. Only the ‘event owner’ can update or delete events previously created. It sometimes more convenient to have the client create the events and add various participants (lawyers and co-parents) to the preliminary calendar.


Note for lawyers / professionals: After the calendars are agreed, if you wish to delete the client from your member / calendar, all events that you created for them will be deleted from your clients view. This is done to prevent events from ‘hanging’ and un-deletable when a member is removed from an account. Your client will need to re-enter a new schedule and re-invite his/ her co-parent to these events if desired.

As an alternative to this, you can instruct your client to create the preliminary calendar events and share with you and his/her co-parent and possible his/her clients attorney. When the preliminary calendar is finished, your client (as the ‘event owner’) can simply delete all attorneys and the events will still remain between the custodial parent and the non-custodial parent exclusively.


How Do I Bill My Client on SmartCoparent?

As a Pro user, billing your client on SmartCoparent is easy. After you have upgraded your account to Pro, follow these steps:


  1. Go to ‘Request Money’ > Payment Settings. Enter your PayPal e mail address
  2. Go to ‘Request Money’ > Payment Request. Select ‘Create Payment Request’
  3. Enter the invoice details. You will be prompted to create a ‘payer’. Enter your payer e mail address.
  4. Complete the invoice details. Be sure to select 0.00 in the ‘My Share’ category (this is for splitting bills)
  5. Select the “Create” button on the bottom of the page
  6. On the next page, attach any internal invoices or bills by selecting the ‘Attach Receipt’ button.
  7. After adding invoices, receipts, select ‘Send’. The invoice will not be sent to the client until you select ‘Send’