Browse Author: admin

How to Add Photos / Docs in Messages

To upload photos, screen prints or documents on our website or app, please follow these easy instructions.


  1. Go to Menu . ‘General’ , select  “Messages”
  2. Select the ‘Attach’ Button

  3. Select ‘Send Message’


4. Select Family member, create subject, message and upload attachment. Once the attachment is uploaded, select ‘Send’


How to Upload Photos / Docs In Chat Message

To upload photos, screen prints or documents on our website or app, please follow these easy instructions.


  1. Go to Menu . ‘General’ , select  “Messages”
  2. Select the ‘Attach’ Button

  3. Select ‘Send Message’


4. Select Family member, create subject, message and upload attachment. Once the attachment is uploaded, select ‘Send’


How Can I Change My Timezone?

SmartCoparent is a global application designed to simplify living in any timezone.

To adjust your timezone:


You can change the timezone by following these instructions
To change your timezone, please follow these easy steps:

  • Go to the menu on the left side of the app, > select ‘Settings’ > select ‘Message Settings’
  • Adjust your timezone and select ‘Update’


Please see attached print screen sample:


If you have any further questions, please contact us at support@smartcoparent.com

Calendar: What’s The Difference Between Assigning an Event or Sharing an Event?

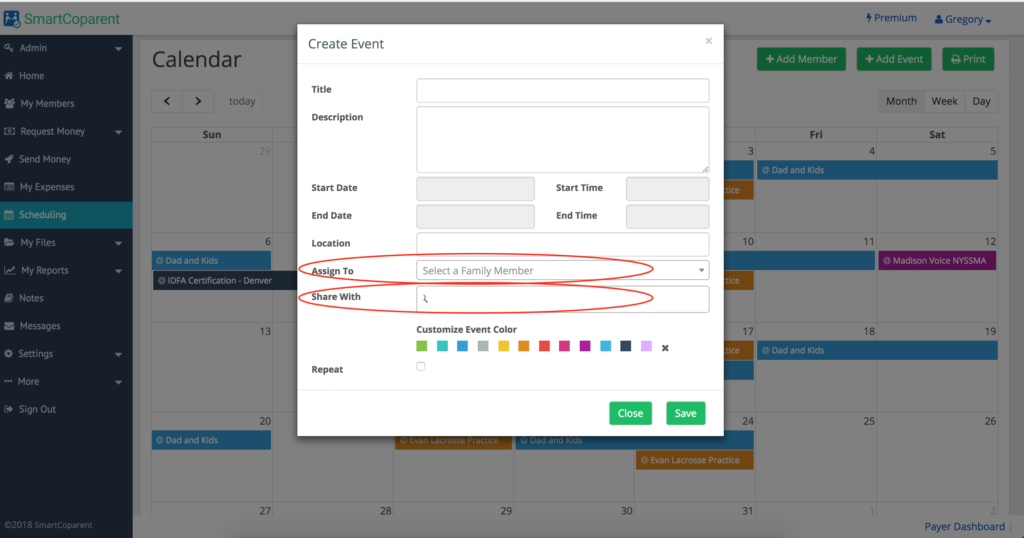
To ‘assign’ or to ‘share’ an event: that is the question….

‘Assigned’ and ‘Share’ calendar events perform the same basic function.

Both members receive alerts if they are assigned or shared an event.

However, for parenting time / child visitation, we recommend that the event to be ‘assigned’ to the co-parent visiting and ‘shared’ with kids or other members.
The reason for this is that SmartCoparent will be launching new reports that will calculate co-parenting visitation days, overnights with kids, etc.. These reports will calculate co-parenting time by ‘assignee’  instead of ‘shared with’.


Here are some sample calendar events and recommended calendar setup:


Sample Event 1: Dad has parenting time with kids

Recommendation: ‘Assign’ event to Dad and ‘Share with’ kids


Sample Event 2: Daughter has a school concert (both co-parents are attending)

Recommendation: ‘Assign’ event to daughter and ‘Share with’ co-parent


Sample Event 3: School is closed for Spring Break

Recommendation: ‘Assign’ event to no one and ‘Share with’ all relevant members.

Create another event that involves co-parent parenting time that overlaps during that same timeframe.


Sample Event 4: Dog has to go to vet

Recommendation: ‘Assign’ event to co-parent taking pet to vet and ‘Share with’ other co-parent


Assigning and Sharing events create the same result, but for future enhancements, parenting time should be ‘assigned to’ the visiting parent.


Please contact us if you have any further question at support@smartcoparent.com

Why Can’t My Member See Any Calendar Entries?


The SmartCoparent Event Calendar is designed to allow for members to see only the calendar events that you want them to see.


To allow your member to see Calendar events, please ensure you either:

  • ‘Assign To’ a member to an event

Or

  • ‘Share With’  a member to an event


Any events that are not assigned or shared with another member, will only be viewable by the event owner.


Please do not hesitate to contact us if you have any questions at:

support@smartcoparent.com


How Do I Initiate Indirect Support Payments on SmartCoparent?

Indirect support payments is the act of paying a third party directly (such as a babysitter or music lesson teacher, etc..) instead of the non-custodial parent.

SmartCoparent allows you to make payments to third parties via PayPal and register these payments to your non-custodial parent.

  1. To initiate an indirect payment to a third party and update your co-parent:

This is a Premium subscription function


Go to the menu and select ‘Send Money’

You will be taken to the payer dashboard

  • On the payer menu, select ‘Create Payment’
  • Enter the amount you want to pay (it will default to the currency on your account)
  • Select your payee from the dropdown list that you want to send a notification to.
    • This will automatically populate the PayPal e-mail address your payee’s SmartCoparent e-mail address.
    • Change the PayPal address to the third party payee that you wish to pay.

  • Select ‘Checkout with PayPal’. You will be directed to the PayPal site to make a payment.
  • Once payment is complete, you and your payee will receive a PayPal notification of payment sent and received.


The Payer will see the payment recorded on SmartCoparent payer dashboard and payment details (see below)


ThePayee account details are also updated in the home dashboard and payment receipts details


2. SmartCoparent lets you make payments on PayPal to anyone.

If you want to make an payment and do not want to send a notification to your co-parent, simply please go to step one and do not select a ‘Send To’ in the ‘Create Payment’ screen. 

If you have any questions, please do not hesitate to contact us at support@smartcoparent.com. We’re here.

How Do I Initiate Direct Payments (without a support request)?

This is a Premium subscription function

To initiate a direct payment to a payee without requiring to a support request:


Go to the menu and select ‘Send Money’

You will be taken to the payer dashboard

  • On the payer menu, select ‘Create Payment’
  • Enter the amount you want to pay (it will default to the currency on your account)
  • Select your payee from the dropdown list.
    • This will automatically populate the PayPal e-mail address your payee’s SmartCoparent e-mail address.

If the PayPal e-mail address is not same as the SmartCoparent e-mail address, please change it here.

  • Select ‘Checkout with PayPal’. You will be directed to the PayPal site to make a payment.
  • Once payment is complete, you and your payee will receive a PayPal notification of payment sent and received.


The Payer will see the payment recorded on SmartCoparent payer dashboard and payment details (see below)


The payee account details are also updated in the home dashboard and payment receipts details


If you have any questions, please do not hesitate to contact us at support@smartcoparent.com. We’re here.


How Do I Share Expenses? (Free account members)

For non-Premium members, sharing expenses is easy:


Exporting Expenses

On your PC, laptop or smartphone, login to your SmartCoparent account on our website  .  Or, cut and paste this URL:  https://app.smartcoparent.com/login

On the menu, select ‘Expenses’ > ‘Manage Expenses’

Select ‘Export’ – the expenses will download into a CSV file. You can download and share unlimited expenses at once.

Send the file via e mail or text to your recipient

__________________

Importing Expenses

You can upload unlimited expenses at once.


On your laptop, PC or smartphone, save the CSV file your received on e mail or text

Then  on your PC, laptop or smartphone, login to your SmartCoparent account on our website  . Or, cut and paste this URL:  https://app.smartcoparent.com/login

On the menu, select ‘Expenses’ > ‘Manage Expenses’

Select ‘Import’ > Select ‘Choose File’ and select the CSV file you saved.

Select ‘Upload File’


All of your expenses will be uploaded into the App.


Please contact us if you have any questions at support@smartcoparent.com

How Do I Use My Premium Upgrade Coupon?

If you received a subscription upgrade coupon, follow these easy steps to redeem your coupon.

  • Login to our subscription page at https://app.smartcoparent.com/subscription. To avoid the 30% surcharge from Apple and Google, please upgrade on our website and not on the mobile apps.
  • Enter your coupon code in the ‘Premium’ section
  • Select the ‘Upgrade’

You will be taken through the subscription process. If your amount is $0, you will not be charged.

To check the status of your current and future billing, go to https://app.smartcoparent.com/subscription/history or select the link shown on the below screen shot.


Your next billing date will be at the top of the page.


You can now go back to your mobile apps on the App Store and Play Store and experience all of our Premium features.

If you have any questions about coupon upgrades, please contact us at support@smartcoparent.com


We’re here.

How Can I Store Important Medical and Other Vital Information?

We made it easy to store and access important vital information on SmartCoparent.
Storing allergy and other information:
1. Keep the vitals in your ‘Contacts’ file. Go to menu > ‘My Files’ >  ‘Contacts’ > Select ‘Create Contact’
2. In the ‘Contact Name’ Section – enter ‘Children’s Vitals
3. In the ‘Description’ Section – enter all of the vital details.
4. Select ‘Add Contact’
Sharing allergy information.
1. Go back to your Contacts files > Select ‘Export’. This will create an excel file with all of your details. Save this on file on your PC.
2. Go to ‘Menu’ > ‘Messages’ > Select ‘Send Message’
3. Select your Co-Parent if they have joined as a member with you. Attach the excel file and select ‘Send’ to deliver the message and attachment.
4. Your co-parent can import the information in her/his contact files instantly. All vital information will be uploaded automatically.
 
If you have any additional questions, please contact us at support@smartcoparent.com