Browse Author: admin

How Do I Share Documents / Photos ?

We made it easy to share documents for members or non-members while ensuring that your privacy remains our priority.

Your members cannot see any of your documents until you share them.


For securely sharing documents with members, go to the main menu, select ‘Messages’

  • Select ‘Send Message’
  • Choose your member
  • Create a short title and subject, attach your document
  • Select ‘Send’

When your member receives the message, he/she can simply download the attachment and then upload to his/her ‘documents’ files. All of the documents will be updated instantly in your members account.


How Do I Share Some or All of My Contacts?

We made it easy to share contacts, for members or non-members while ensuring that your privacy remains our priority.

Your members cannot see any of your contacts until you share them.


To share your contacts, we recommend the following steps:SGo to ‘My files’ > select ‘Contacts’

  1. Select export
  2. Enter the contacts that you wish to share on the spreadsheet
  3. Save your spreadsheet

For sharing with members, go to the main menu, select ‘Messages’

  • Select ‘Send Message’
  • Choose your member
  • Create a short title and subject, attach your contacts CSV file
  • Select ‘Send’

When your member receives the message, he/she can simply download the attachment and then import the contacts to his/her ‘Contacts’ files. All of the files will be updated instantly in your members account.

For sharing contacts with non-members, simply send and e mail or text to your contact and attach the CSV file you created.


How Do I Store Documents?

Storing Documents is very simple.

Go to the Main menu > select ‘My files’ > Documents


Select the ‘Create Document’ button

Select the ‘choose file’ and select the document from your files from your PC, (or on your mobile device as well).

Select ‘ Add Document’.


Your document will be uploaded instantly!


Make sure your documents, photos, etc.. are less than 50mb in size each.


How do I Add Contacts?

Adding contacts is very simple.


Go to the Main menu > select ‘My files’ > Contacts

You can add contacts 2 ways.

Either (a) manually entering each contact by selecting the ‘Create Contact’ button,

or by (b) uploading a CSV spreadsheet with your contacts.


To upload contacts via spreadsheet, follow these easy steps on your desktop or laptop:


  1. Click the ‘Export’ button. A pre-defined CSV template will be downloaded.
  2. Enter your contact details or cut and paste the details into each of the appropriate cells in the spreadsheet. Not all details are required to be filled in.
  3. Click save on the CSV file
  4. Go back to your SmartCoparent account > Contacts > select ‘Import’. Choose the file you saved on your desktop and select ‘Upload’.

Your files should be all uploaded onto your SmartCoparent directory!

Why Can’t My Support Payer Pay Me On-Line?

To receive and pay support payments on-line, the non-custodial parent must be a Premium subscriber:

When a support payer receives a support payment request from a free / starter account, the PayPal payment instructions are blank. The payer can still approve or deny payment requests, but cannot make payments on-line via PayPal:

When a support payer receives a support payment request from a Premium account, the PayPal payment instructions are shown:


To allow your support payments to be paid on-line and marked as paid automatically, simply upgrade to Premium:

  1. Go to the main menu, select ‘More…’ > Subscription
  2. Upgrade to Premium
  3. Go back to ‘Home
  4. Click on the link to add your PayPal e mail to receive payments from your support payer.
  5. Automatically receive support payments on-line!


Who Can See My Calendar Events?

Calendar Events

SmartCoparent shared calendar is designed to be as flexible as possible. Letting you assign and share events to members, or keep them private.

Your calendar events are private to you unless you assign an event to your member(s) or share an event with a member or members.

Here are a few scenarios we created to help you understand the calendar access:

  • Example 1: If you have 1 adult member and 2 children members on your platform and you create an event that is not assigned to any of those members (and you do not share that event with anyone), that event is for your eyes only.


  • Example 2: If you create an event and assign that event to your adult member (i.e. ‘co-parent visitation’) and do not share that event with anyone else, your adult member will receive a notification and will be able to view that event.


  • Example 3: If you create an event and assign that event to child 1 and you do not share that event with anyone, only you and child 1 can view that event.


  • Example 4: If you create an event and assign that event to child 1 and share that event with child 2, only you, child 1 and child 2 can view that event.


  • Example 5: Create an event, assign that event to no one and share that event with child 1, child 2 and your adult member, everyone will be able to view this event. i.e. (‘No School, Snow Day’)


How Do I Create A Calendar Event?

To Create an event:

Go to ‘Schedule’

Select the date or select ‘add event’

Enter the event details

  • Title
  • Description
  • Start Date / Time
  • End Date / Time
  • Assigned event to (if any)
  • Share event to members (if any)
  • Select ‘Repeat’ if this is a recurring event
  • Select optional custom event colors
  • Select ‘Save’

Assigning Calendar Event Colors

It is recommended that you assign a calendar event color to yourself and your members so it is easy to decipher which events belong to whom.

To assign and event color to yourself or your children,

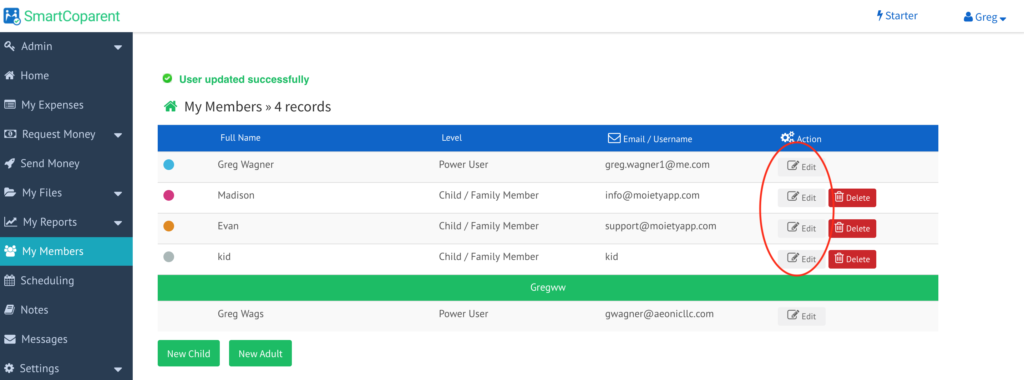
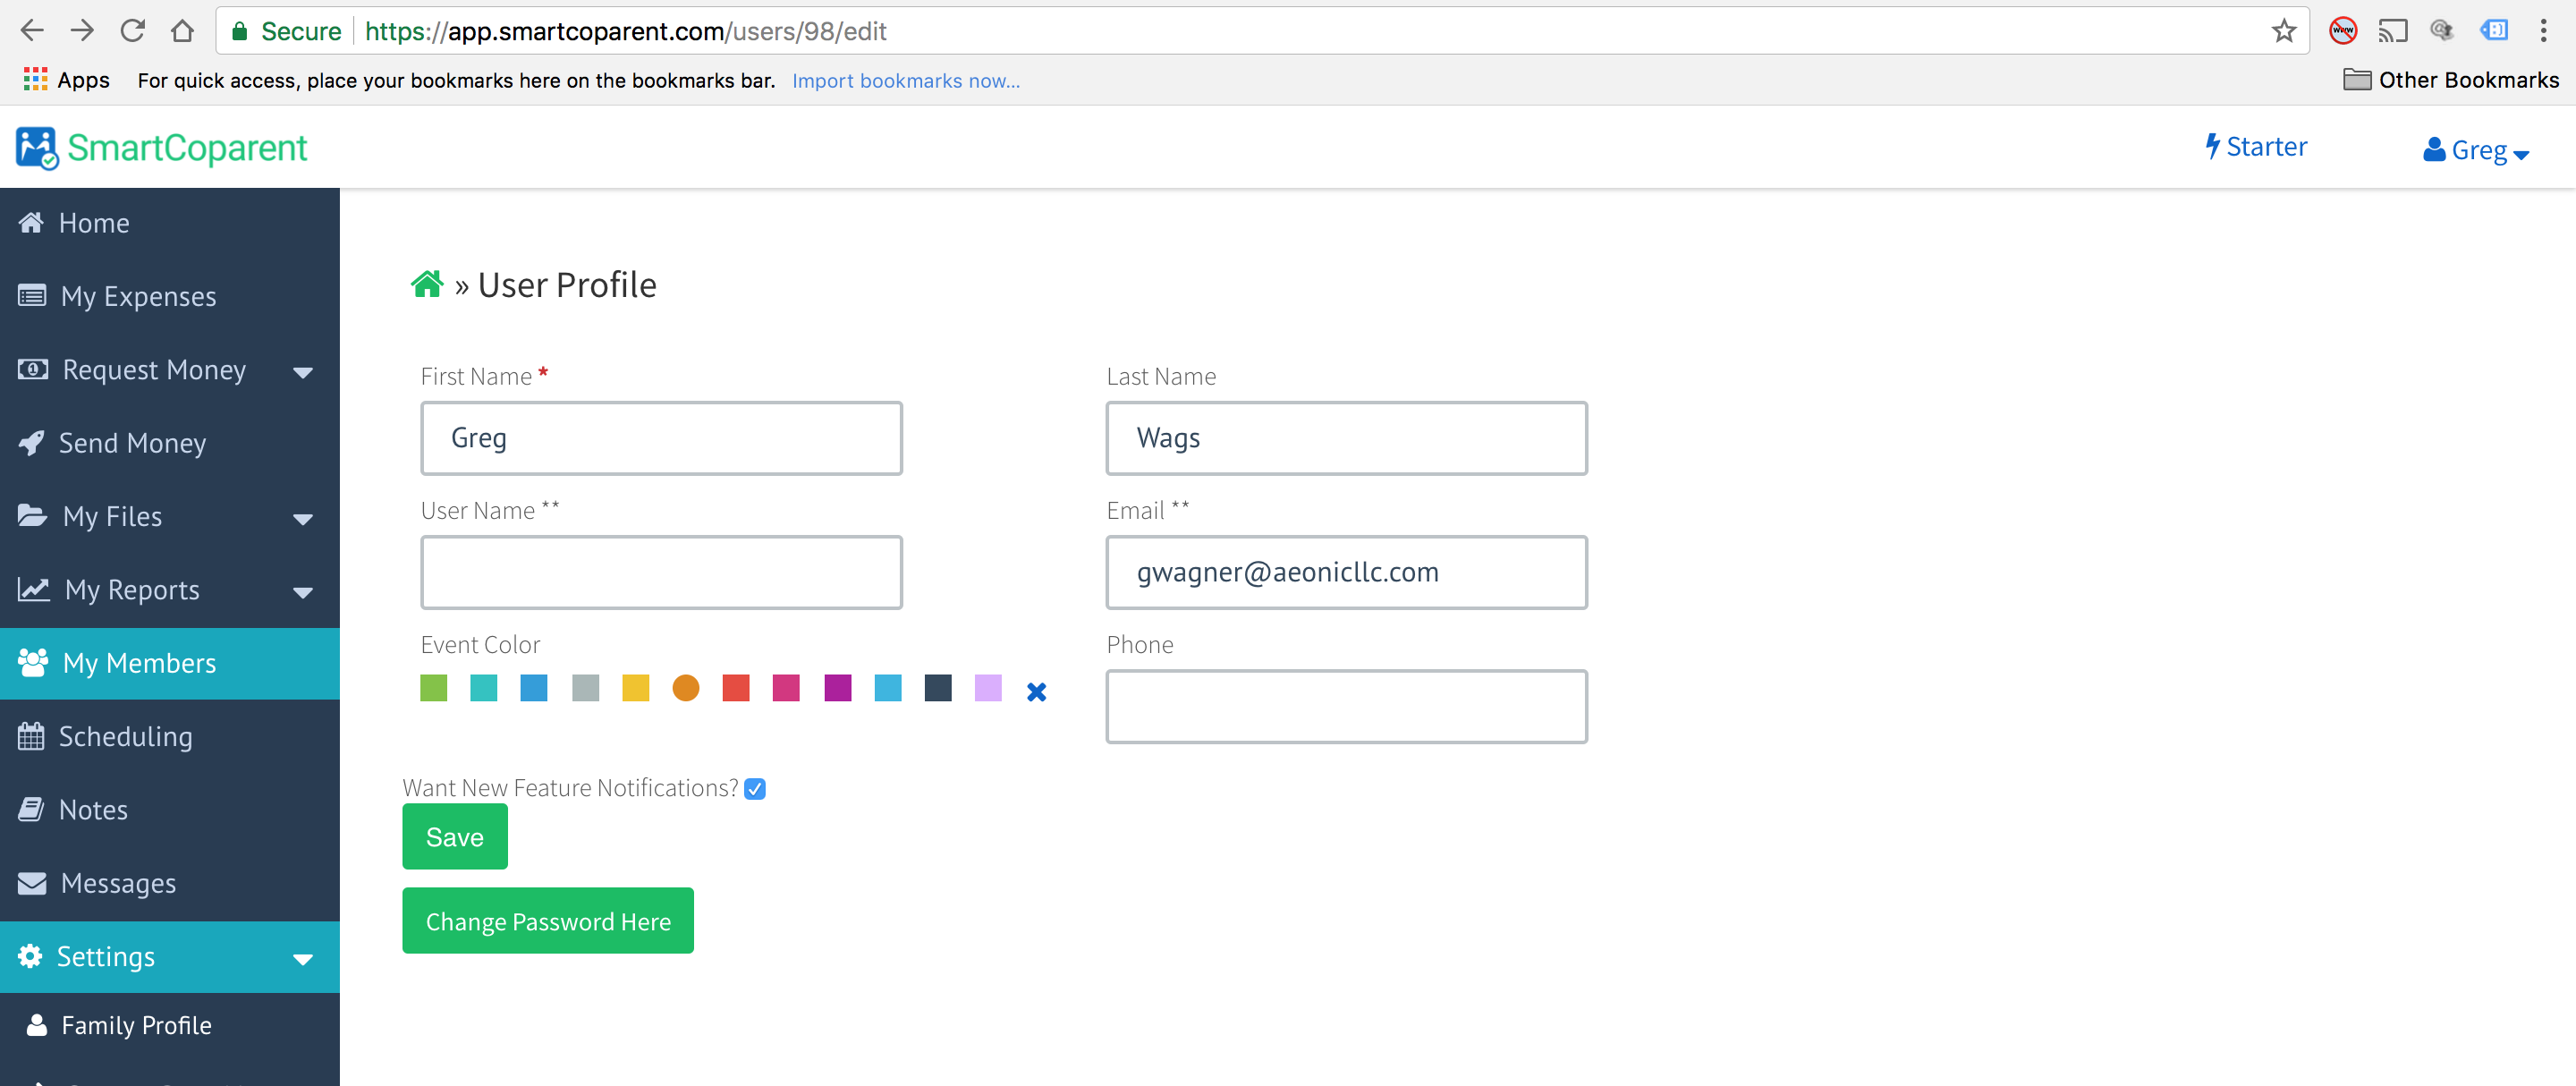
Go to ‘My Members’ select the edit function on the right side of the screen.

Select the color and then select ‘Save’.


Adult members that you invite to your account will set their own color profile.

The default event color is black until the color is changed by the  adult member.

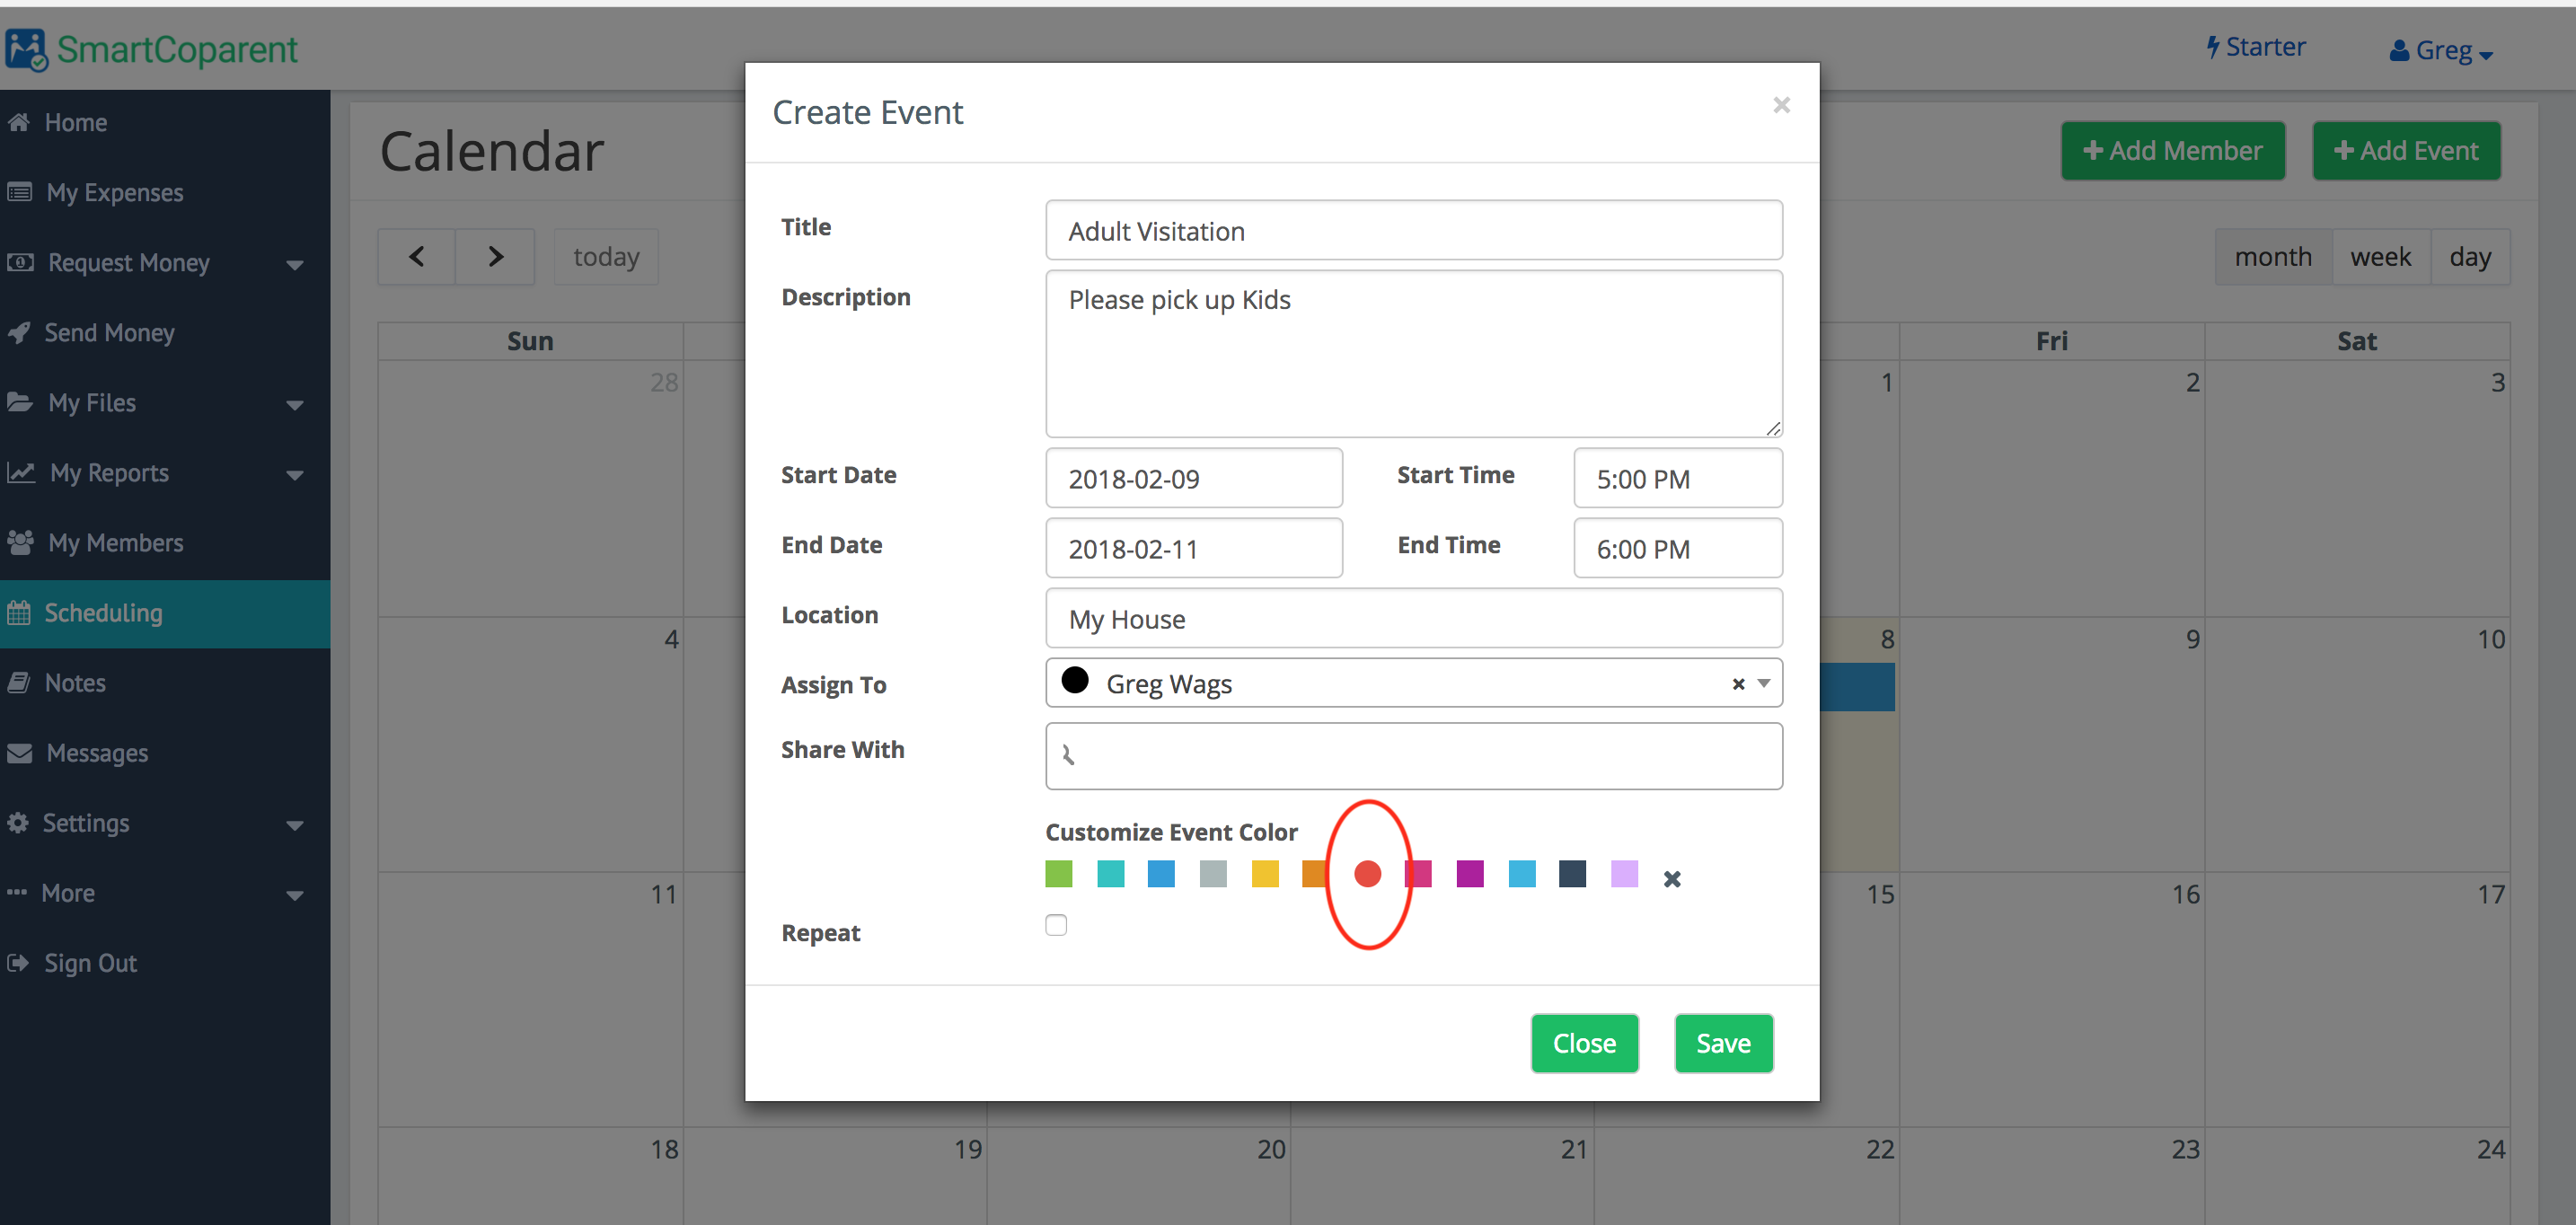
If you wish to assign a color to an adult who has not created his / her own event color, or who has not accepted your invitation to join, please follow the steps on the bottom of this page:


To assign and event color to an adult.

Adult members that you invite will set their own color profile.  Until adult members they select their own color, their default event color will be black.

If you wish to assign a different color to an adult who has not created his / her own event color, simply go to

Scheduling > Add Event >

Fill out the event details, assign event to the adult and then select the customize event color and then select ‘save’.

This is also useful for adults who have not joined SmartCoparent and you simply want to assign event colors for your own  calendar organization.


I Added My Co-Parent As A Member. What Can She / He See on My Account?

SmartCoparent is designed for co-parents to have sufficient privacy to their accounts, while allowing them to share some information, when they choose.


If you recently added an adult member (i.e. co-parent), they can see a limited amount of information:

  • Calendar: Adults can share calendar events  and see calendar events where they are assigned an event or you invited them an event. Adult members cannot see any events that the account owner has not assigned to them or invited them to see.
  • Children accounts. Your adult member can assign and share events to children that your invited.


  • Messaging: Adults can message each other on the in app messaging app. Members can attach files to share documents and contacts through the messaging application.
  • Children accounts. Your adult member can message / chat with children that you invited to your account.


Your adult member cannot see on your account:

  • Your expenses that you do not share
  • Your expenses dashboard (they have their own)
  • Your Payer Portal (they have their own)
  • Your Payment Gateway / Payment settings
  • Your Subscription details
  • Documents that you store and do not share
  • Contacts that you store and do not share
  • *Any other adult that you invited as a member on your account
  • Your Financial or Activity Reports (they have their own)
  • Your Notes / Private Journal

* One point to be aware. If you assigned and event to your co-parent and shared that event to another adult, your co-parent will see all the details of that event (including who you shared the event with). 

What Does My Child Have Access To On SmartCoparent?

On SmartCoparent, children accounts are arranged very differently than adult member accounts.

For your privacy and their protection, child accounts only have access to:

  • Shared Calendar
  • Messaging
  • Notes (Private)

Children can view only calendar events that they are invited to or, that they have been assigned to. They cannot see any other calendar events on your account. Children can create events with you, but they cannot invite new members to the calendar.

Children can message with you or other members your invited (such as your co-parent), but they cannot invite new members to message on SmartCoparent.

Children can use the Notes / Journal function for their own purpose.


Children are restricted from seeing all other account features:

  • Expenses
  • Payment requests
  • Payments
  • Expense Dashboards
  • Payer Dashboards
  • Reports
  • User Settings
  • Member Settings
  • Your Private Notes
  • Subscription
  • Etc…

Please see a sample of a typical Adult account setup and a Child account setup:

  1. A typical Child Dashboard setup


2. A Typical Adult Dashboard setup